Manage your Account
Get Started with the Account Manager
The Account Manager is where you set up your account, gain insights into your usage, create reports, invite and manage users, purchase platform access plans and data products, handle billing, and review your order history.
How to Access the Account Manager
There are three ways to reach the Account Manager:
- Go directly to insights.planet.com/account.
- Open it from the Planet Insights Platform homepage.
- Switch to it at any time from the top-left navigation menu while using the platform.
User Roles and Permissions
Roles are scoped at two levels: the customer account and the individual workspace.
- Account Admin: Has full administrative privileges across the entire customer account. Account Admins create workspaces, allocate quota, and manage members in every workspace. They can consume quota from only one workspace.
- Account Member: Has access to the customer account without account-level administrative privileges. Within a workspace, an Account Member is assigned either the Workspace Admin or the Workspace Member role.
- Workspace Admin: Administers only the workspace they are assigned to. Workspace Admins cannot manage the account's overall quota or interact with other workspaces.
- Workspace Member: Performs quota-consuming actions and uses shared resources within their assigned workspace.
| Permission / Action | Account Admin | Workspace Admin | Workspace Member |
|---|---|---|---|
| Make purchases | ✅ Yes | ❌ No | ❌ No |
| Manage account user roles (invite users, assign initial roles) | ✅ Yes | ❌ No | ❌ No |
| Move users between workspaces | ✅ Yes | ❌ No | ❌ No |
| Create workspaces | ✅ Yes | ❌ No | ❌ No |
| Distribute credits and product quota across the account and workspaces | ✅ Yes | ❌ No | ❌ No |
| Add users to a specific workspace | ✅ Yes | ✅ Yes | ❌ No |
| Manage user roles within a workspace | ✅ Yes | ✅ Yes | ❌ No |
| Consume quota and Monitoring Credits | ✅ Yes | ✅ Yes | ✅ Yes |
| Use shared resources in a workspace | ✅ Yes | ✅ Yes | ✅ Yes |
About Your Account
The Overview tab provides essential account details.
- Your current platform plan and its validity
- Account and User ID
- The workspaces your account is associated with
- The ability to manage both active and inactive OAuth clients
Usage and Reporting
There are two key tabs that provide insight into your platform usage and activity.
Usage
Usage and reporting provides a detailed overview of your current platform usage. Platform actions are metered in Monitoring Credits; other products, such as tasking, are tracked against their own quota.
Quota bars give information about:
-
Percentage of quota used
-
Number of days remaining
-
Detailed breakdown of usage
-
Total amount of quota used
-
Remaining amount of quota
-
Purchased quota
-
You can also access detailed usage reports to analyze your activity over time.
How to download a Monitoring Credits report
Reports are generated from the Monitoring Credits Report section at the bottom of the Usage tab. If your account uses workspaces, the report covers the workspace you are viewing, and Workspace Admins can generate reports for their own workspace.
Select the report type: Daily, Monthly, Detailed, or Summary.
Choose a date or month.
Download the report as a CSV file.
A monthly report is only available once that month has ended. To review usage for the current month, use a daily or detailed report instead.
Top-up functionality
Depending on your contract, you may be able to top up your Monitoring Credits balance directly from the Usage tab.
Top-ups are one-time Monitoring Credits. They are not recurring and do not upgrade you to a higher tier. Use them to absorb a one-time usage spike, such as a single large analysis of historical data, or a month where your usage ran high and you need to keep operating.
Usage warnings and notifications
Usage warnings help you stay ahead of quota limits. When your usage reaches 90 percent of your quota, an orange alert bar appears in the Account Manager as a reminder to top up your resources before they run out.
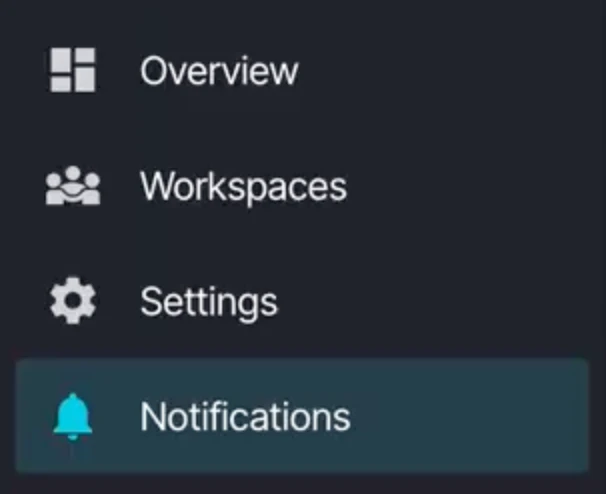
You can also receive quota-related notifications in the Planet Insights Platform. Notifications appear under the bell icon in the upper-right corner.
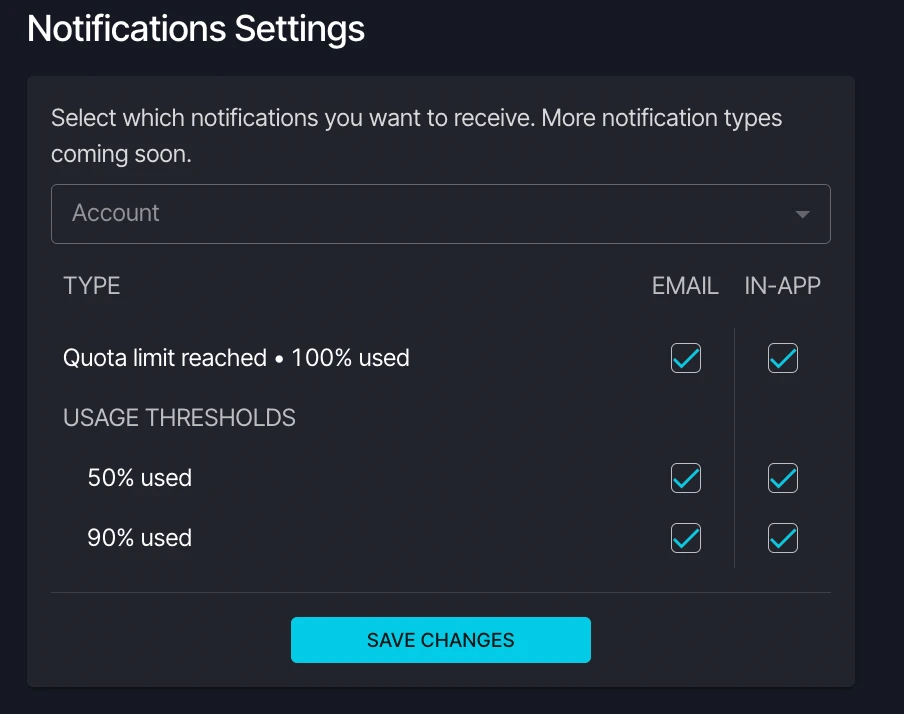
In Account > Notifications, you can manage available notification preferences, including quota threshold and quota exhaustion notifications, and choose supported delivery channels such as email or in-app notifications.
Quota notifications fire at 50 percent, 90 percent, and 100 percent of your quota. For each threshold you can choose to be notified in-app, by email, or both.
Statistics
The Statistics tab provides an additional way to explore your Monitoring Credits and the number of requests consumed over time. It provides a visual and filterable view of your activity, helping you understand trends and pinpoint usage patterns.
- Time-based filtering
You can filter usage data by specific time frames, such as: Last 1 hour, Last 12 hours, Last 24 hours, Last week, or Last month
- Interactive usage graph
A dynamic graph displays how your Monitoring Credit consumption has evolved over the selected time period, providing immediate insight into usage spikes or patterns.
- API-level breakdown
You can view usage filtered by individual APIs.
Users
The Users tab is designed to help administrators manage their users on the account. The necessary management functionalities are available within the Users tab, where administrators can do the following.
-
Invite new users
-
Manage user roles
-
Move users between workspaces
-
Deactivate, reactivate, and remove users from your account
-
View and manage pending invitations
The Users tab is only accessible to account administrators.
Inviting New Users
Account administrators can invite users to join their account. They can go to the Users tab, click on the INVITE NEW USER button and fill in the mandatory fields (through email only). To invite more users at once, click the plus button [+]. If a user already exists on the platform, the system will notify the administrator that the email address is already in use. Once the admin is satisfied with the input, they must click INVITE. This action will send out email invitations.
To onboard a large group at once, upload a CSV file of email addresses instead of entering them one by one.
Invited users will have 14 days to accept the invitation. Until an invited user accepts the invitation, they will be listed under Pending invitations. Administrators can revoke the invitation or resend the email with the invitation to the user.
When a user accepts the invitation, they are added to the account and are listed in the Users table.
Your platform access plan determines the maximum number of users allowed. Once the limit is reached, you’ll need to upgrade your plan to add more users.
Change User Role
If an administrator wants to change a user's role, they need to select the user(s) by clicking the inline checkbox in the table. Then they can change their roles as they need.
The system requires at least one administrator user on the account. The last user with the administrator role cannot be changed to a member.
Workspace Admins can change roles within their own workspace, but only Account Admins can change a user's account-level role.
Move Users Between Workspaces
Account Admins can move a user from one workspace to another from the Users tab. Select the user, choose the destination workspace, and confirm.
When a user moves, they lose access to the Configurations and Collections of their previous workspace. Select Move assets to the new workspace during the move to bring those assets with them.
A user belongs to one workspace at a time. Multi-workspace access is coming soon.
Deactivate or Reactivate a User
Deactivating a user suspends their access without removing them from the account. Select the user, click Membership, and choose Deactivate. Deactivated users keep their place in the Users table and can be reactivated the same way.
Use deactivation for a user who is temporarily away or between roles, and removal for a user who is leaving permanently.
Remove a User From an Account
If you want to remove a user from their account, select the user and click Membership. Click the Remove option and the Account Manager asks for additional confirmation. If the administrator confirms, the user is removed from the account.
Removing a user is permanent. The account cannot be restored, and the same email address cannot be used to create a new account. Deactivate the user instead if you may need to restore their access later.
Workspaces
Workspaces is not currently available to all customers. Customers will be notified by email if / when Workspaces becomes available to them. If you do not see workspace features in the Account Manager, contact Planet Support or your Customer Success Manager.
Workspaces help you organize people and usage within your customer account. Each workspace is a separate place to work, and usage is tracked against the quota allocated to that workspace.
What you can do with workspaces (if available):
- Create and manage workspaces
- Add users to a workspace and assign roles
- Track usage by workspace
- Allocate quota to a workspace
To create a workspace, click Create New.
The default workspace limit is 25. Contact Planet Support or your Customer Success Manager to request more if you need additional workspaces.
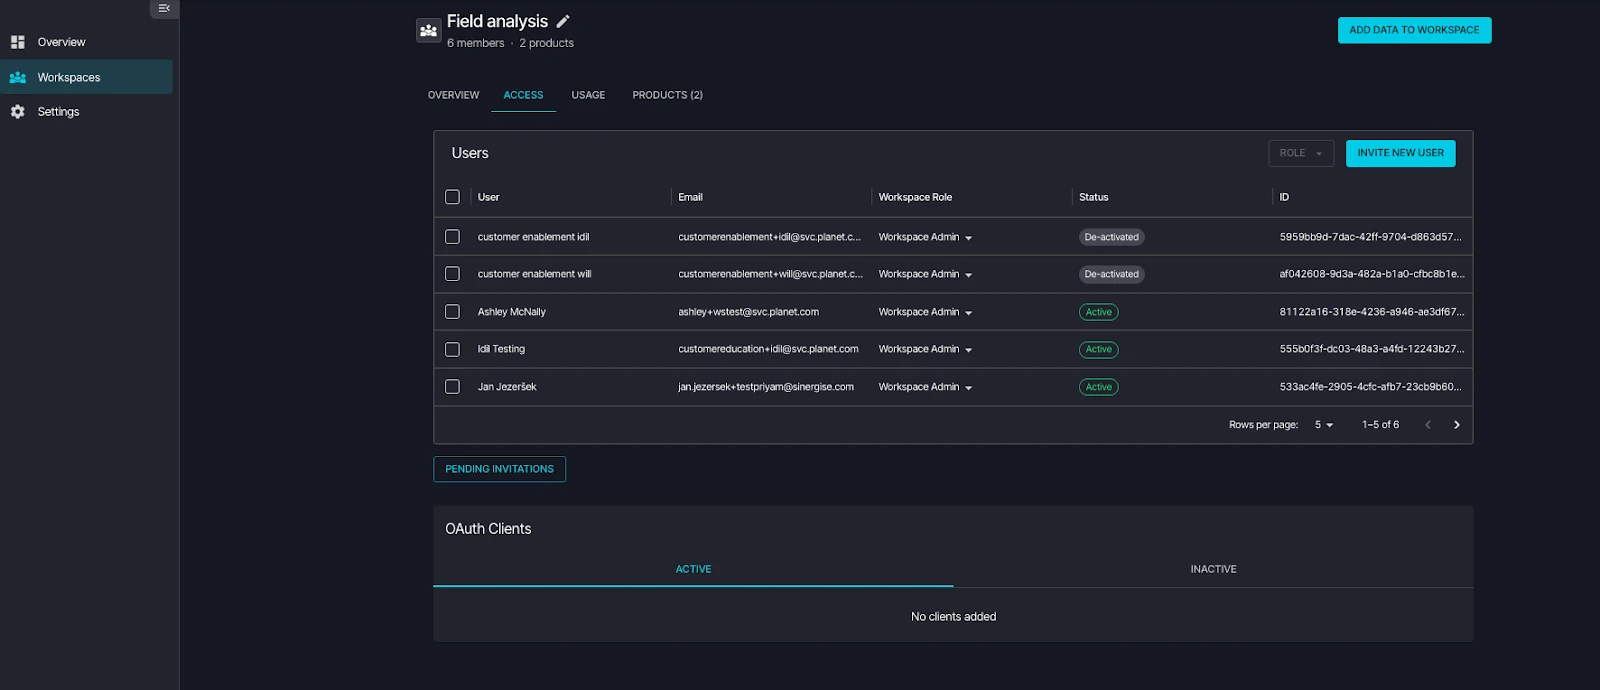
Use Manage Access to add, remove, or move users between workspaces.
Creating a Workspace
Account Admins create workspaces from the Workspaces tab. Click Create workspace, give it a name, and confirm.
Your plan determines how many workspaces you can create. If you have reached the limit, upgrade your plan or contact your Customer Success Manager.
Inside a Workspace
Selecting a workspace opens three tabs:
- Access: The members of the workspace and their roles. Account Admins and Workspace Admins can add members here and change a member's role between Workspace Admin and Workspace Member.
- Products: The data products allocated to this workspace, with provisioned and used quota for each.
- Usage: Monitoring Credit consumption for this workspace, along with the Monitoring Credits Report generator.
Quota Management
If your account uses workspaces, quota is provisioned at the customer account level and must be allocated to a workspace before it can be used.
🔒 Only account administrators can allocate quota.
Open the Quota management tab in the Account Manager.
Select the source you are transferring from: the customer account, or another workspace.
Select the product whose quota you are transferring.
Select the destination workspace.
Enter the amount to transfer.
Review the transfer summary and confirm.
Credits
For credit-based packages, the data product and the Monitoring Credits are allocated separately. A workspace needs both before it can use the product: allocating the data product grants access to it, and allocating credits gives the workspace a balance to spend against it.
Credits are fungible across the data products you have purchased. One credit balance covers every product allocated to the workspace, so you do not need to divide credits up product by product.
If a workspace holds more than one type of credit, see Monthly and Annual Monitoring Credits for the order in which they are drawn down.
Rules and limitations
- Quota is allocated to a workspace, not to individual users. Everyone in the workspace draws from the same balance.
- Quota is allocated using absolute numbers, not percentages.
- You can allocate only unused quota.
- Quota cannot be transferred between different products. A transfer moves quota for one product from one place to another.
- Area Quota products and Platform Access products cannot be transferred in the same operation. Run a separate transfer for each.
Quota allocation is not available to every customer, and not every product supports allocation.
Products that cannot share a workspace
Some products conflict and cannot be allocated to the same workspace:
| Product | Cannot share a workspace with |
|---|---|
| Planet Insights Premium | Planet Insights Reserved |
| Mosaics Hybrid | Mosaics Subscription |
| Mosaics Hybrid | Mosaics SuperRes Subscription |
| Mosaics Subscription | Mosaics SuperRes Subscription |
| Agriculture Global | Agriculture Tiers 1–3 |
| Agriculture Global and Agriculture Tiers 1–3 | Agriculture Subscription Plans |
| Openwater Archive | Openwater Archive (with 30 day hold) |
Products that must share a workspace
Other products only work when they are allocated together:
| Product | Must share a workspace with |
|---|---|
| Planet Insights Flex, Premium, and Reserved | Monitoring Credits |
| Agriculture (Global and Tiers 1–3) and Agriculture Subscriptions | Monitoring Credits |
| Mosaics (Hybrid, Subscription, and SuperRes) | Monitoring Credits |
| Openwater Monitoring | Openwater Archive |
Products that require a quota reservation
For some products, allocating quota to a workspace is not enough on its own. You also need to reserve quota against a specific area of interest before you can use it. This applies to Planetary Variables and ARPS. See Reserve quota and the Quota Reservations API for details.
Products that do not support quota allocation
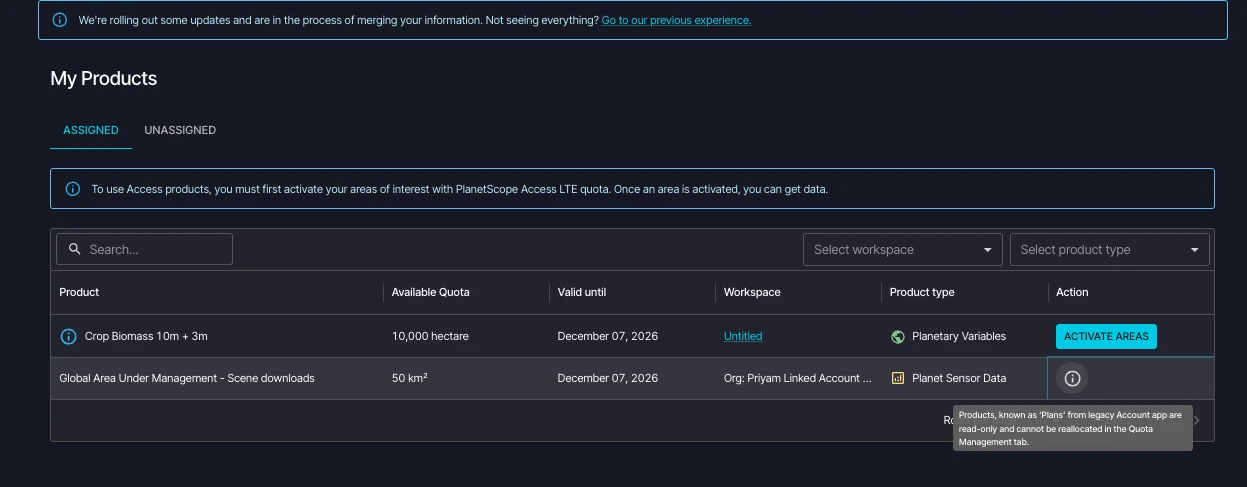
Some products do not support workspace quota allocation. You can still view these products and their usage in My Products (for example, under Legacy), but you cannot reallocate them in the Quota management experience. If you need to provision these products across multiple workspaces, contact your Customer Success Manager.
Products that do not support quota allocation include:
- Custom Mosaics
- Analytic Feeds
- Tasking credits
Legacy products are read-only in the Account Manager and are not part of self-service quota management.
Invoices
The Invoices tab enables account administrators to manage and review past orders, as well as their associated billing information. Depending on your contract, this tab may not appear in your Account Manager.
Key Capabilities
From the Invoices tab, administrators can:
-
View the complete Order History
-
Access detailed information for each past order
-
Review payment status, billing cycles, and download invoices
Billing Cycle
Each order displays its selected billing cycle:
-
SINGLE: a one-time payment for annual subscription (or co-term order to annual subscription)
-
RECURRING: a monthly subscription, payment happens automatically each month
Order Statuses
Each order includes a status indicator.
-
PAID: Payment received successfully.
-
PENDING: Order placed; awaiting payment completion.
-
CANCELED: Order automatically canceled due to non-payment.
-
OFFER: Custom offer sent to the customer; payment pending.
-
SUBSCRIBED: User enrolled in a recurring subscription following initial successful payment.
-
REVOKED: Order canceled by the user.
-
PAUSED: Order is temporarily on hold.
Order Details
Click Details on any order to open the Order Details page. You can view or request the following:
-
The Order ID
-
Purchased items
-
Update billing information
-
Review payment history
-
Download an invoice for each payment
🔒 The Invoices tab is only accessible to account administrators.
My Plan and Products
The My plan and products tab provides you with a detailed view of your active platform plan, including its validity, a shortcut to order details, and an option to top up their platform access plan.
Depending on your contract, a Top up button lets you add one-time Monitoring Credits without moving to a higher tier.
Some products support self-service quota allocation in Quota management. Products that do not support allocation are read-only in My Products; contact Planet Support or your Customer Success Manager for help managing them across workspaces.
Under My Products, all provisioned products are listed, including product name, product type, provisioned quota, used quota, and validity. For credit-based packages, this includes your provisioned and used Monitoring Credits.
If your account uses workspaces, each product also shows the workspace it is assigned to. Products that have not been assigned yet appear as unassigned, with an Allocate button that takes you to Quota Management.
🔒 The My Plan and Products tabs are only accessible to account administrators.
Purchase
The Purchase tab is where account administrators buy platform access plans and data products, and upgrade an existing plan. Depending on your contract, purchasing may be handled by your Customer Success Manager instead, in which case this tab does not appear.
🔒 The Purchase tab is only accessible to account administrators.
Settings
The Settings tab has two sections: Account Settings and User Settings.
Currently, English is the only language supported on Planet Insights Platform. For support in any other language, we recommend trying the Ask AI chat assistant available in the platform.
Account Settings
Under the Account Settings, users can copy their Account ID and edit their Account name. You might need your Account ID for workflows that share resources across teams, and when contacting Planet Support or discussing billing.
🔒 The Account Settings are only accessible to account administrators.
User Settings
Under User Settings, users can see their user profile details. Each user can view their user role on the account:
-
Admin: administrator permissions
-
Member: membership on the account without administrator permissions
Users can edit their first name and last name and change their country by selecting from the drop-down list. Your User ID is also shown here and can be copied for support requests.
This is also where you retrieve your API key for authenticating requests to Planet APIs.
Never share your API key. It authenticates as you, and anyone who has it can consume your quota and access your data.
Users can delete their profile, which also removes them from the account. If an account has multiple users, the only admin user on the account can not delete their user profile, as this would affect other users on the account as well.