Beginners guide to working with Data Collections
The Browser is a cloud based service providing easy access to global archives of analysis-ready Earth Observation data from all the major providers. Our services include a range of APIs that allow users to search, process, analyze, visualize, and download satellite data, as well as integrate it into their own applications. We have prepared elaborate examples for each API in our documentation for users to get started. In addition, we recommend a series of Planet University courses that provide step-by-step instructions for getting started with our services. Make sure to also see some useful links in the last chapter of this guide.
In this tutorial you will learn how to get started with our services, by learning to run a simple API request. You will be using our Processing API to request satellite images, and Catalog API to find the list of the available images corresponding to your settings.
The guide will present 3 different approaches for you to choose from:
- Requests Builder - Our user interface application for sending API requests - The easiest way to work with the API
- Command line CURL - Running requests in your command line interface
- Python - A popular framework that makes it possible to use various Python libraries for EO analysis
We strongly recommend that you first go through the Request Builder chapter in detail, and then choose which of the other frameworks you are interested in.
In each section, you will be sending requests from documentation, as well as requesting a Sentinel-2 image of Lighthouse Reef:
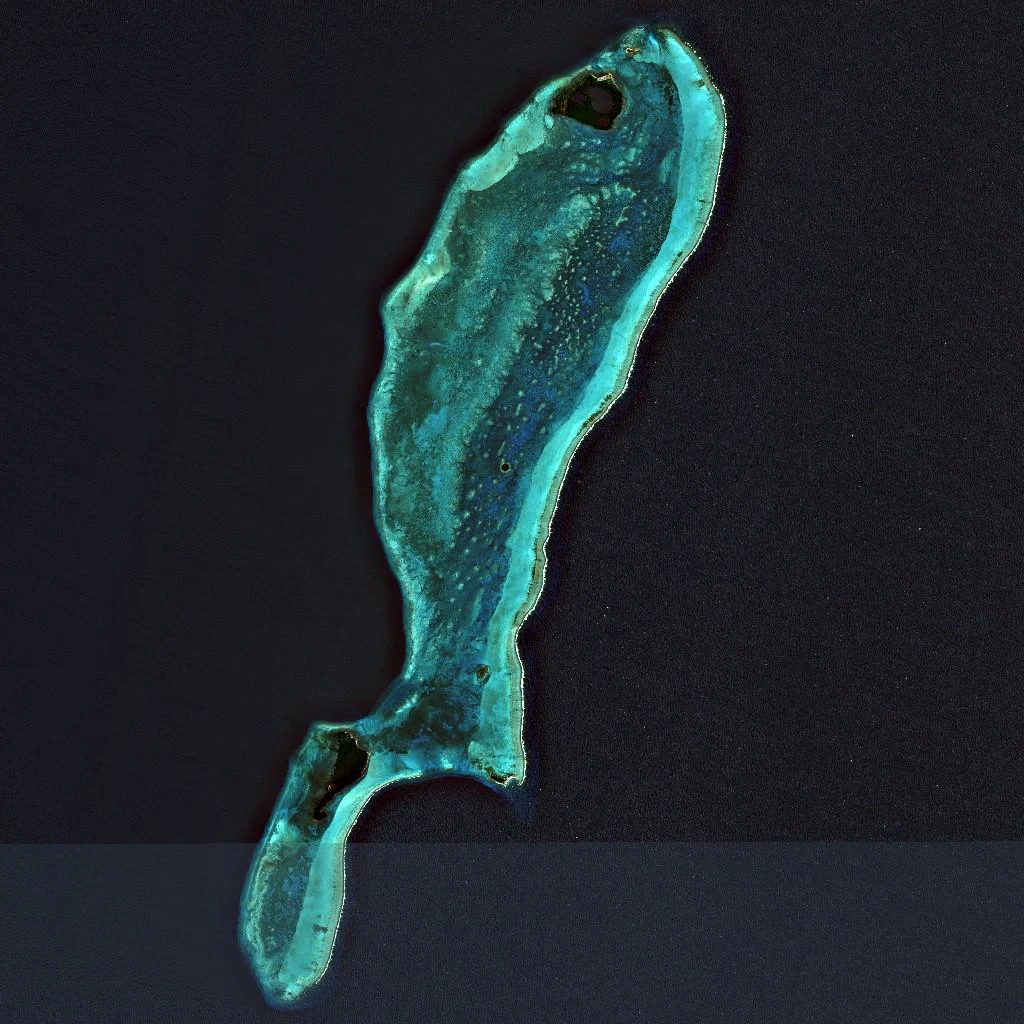
Example Output
Think of these examples as templates. You can easily adapt them by modifying key elements like the bounding box, time range, or data collection to match your specific area of interest, timeframe, or sensor type.
Requests Builder
Requests Builder is a user-friendly graphical interface designed for easy access to satellite imagery without handling commands, scripting language, and OAuth clients. It is a powerful tool for making API requests and the fastest way to retrieve an image using the Browser.
Before we begin, open Requests Builder. You will be prompted to log in with your Planet account credentials.
Run the Example Request from Documentation
- Copy the Sentinel-2 true color example request in CURL format below (you can also check our documentation here):
- Paste the CURL requests to the Request Preview window in Requests Builder (you can find the section on bottom right).
Paste CURL into Preview
- Whenever changes are made in the Request Preview window, make sure to click the Parse button to apply the changes. This will update the user interface with the selected parameters.
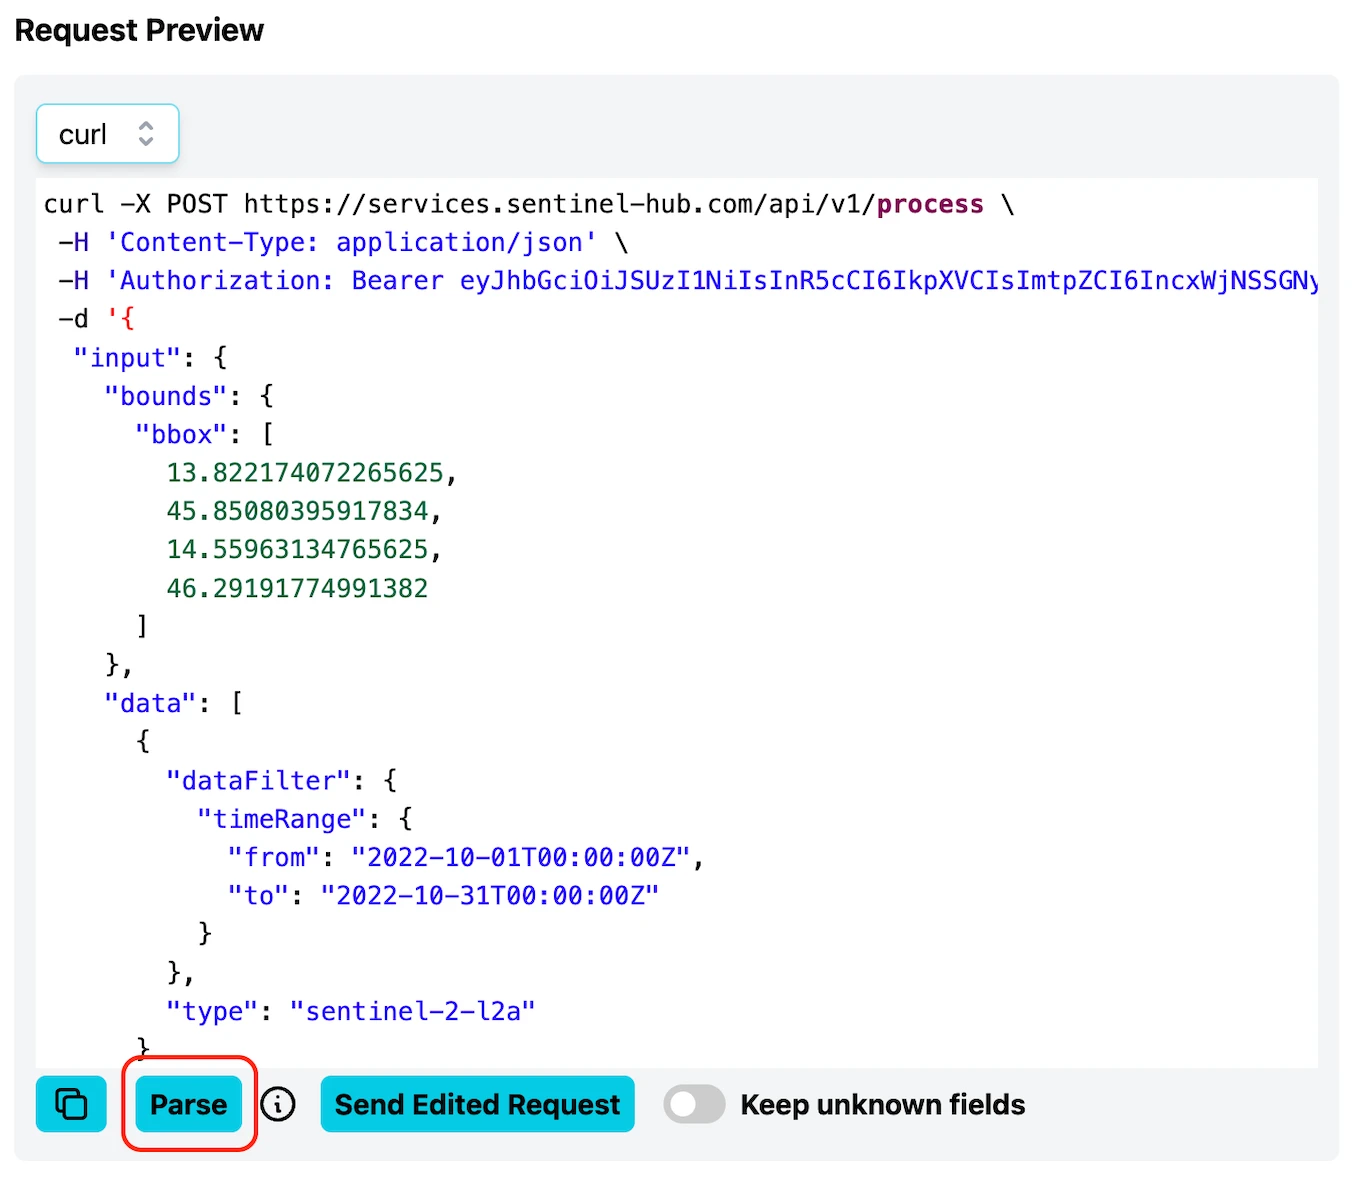
Parse Button in Request Builder
- Click the Send button in the top right. Once the request is processed, a preview thumbnail of the satellite image will appear in the response window. You can either download the image to your computer or add it to the map in the Requests Builder.
As you will see, the true color example request from documentation is of landscape in western Slovenia.
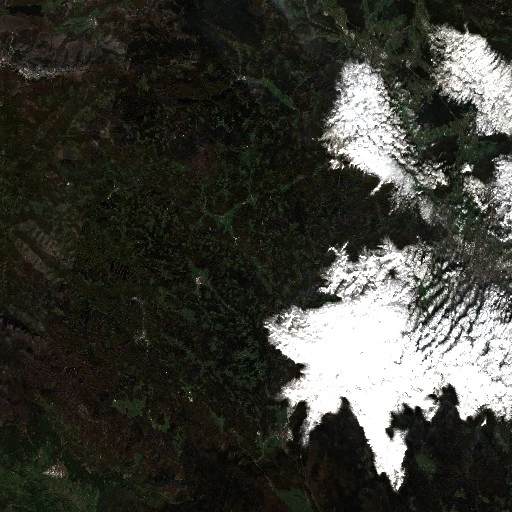
Slovenia True‑colour Preview
This way, you can send any processing request from the Browser in CURL format.
Build Your Own Custom Request
It is easy to build a custom request with our Requests Builder by selecting parameters in the graphical user interface. Each time you make a change, the API request will update automatically. The general parts of the Request Builder are the following:
API: Several APIs are available in the Requests Builder, each with its own parameters. To get satellite imagery, use the Processing API (preselected by default). You can find an overview of all available APIs in our API documentations. Below are a few key APIs available through the Browser, along with what they help you do:
- Processing API: Get satellite imagery and metadata
- Batch Processing V2 API: Handle large or long-term requests (for example, year-long coverage of a region)
- Bring Your Own COG API: Work with external datasets you have uploaded
- Catalog API: Search available satellite data based on time, location, and more
- Statistical API: Run statistical analyses over chosen areas
- OGC API: Stream EO data into apps using standard web service protocols
Data Collection: You can access a range of data collections directly in the Browser, including the option to use your own uploaded data via the Bring Your Own COG feature. This lets you work with external datasets you have already prepared and ingested.
Advanced Options: The parameters in this window are specific to each collection. They allow you to control maximum cloud coverage, the mosaicking order, the method of interpolation and more. Additional information can be found in our documentation, for example, under Sentinel-2 L2A maxCloudCoverage, mosaickingOrder, and processing options.
Time Range: Select a specific acquisition date, or a time-range.
Area of Interest: Select a desired coordinate reference system from the droplist and draw a polygon or a rectangle over the map to set your area of interest. Alternatively, import a KML/GEOJSON file or paste in the coordinates. Click Parse.
Output: Specify the output format (TIFF, PNG, JPEG or APP/JSON) and width/height in pixels or x/y resolution in meters.
Evalscript: Define how satellite data should be processed and visualized. Check out the Evalscript (custom script) page for more information.
Request Preview: The Request Preview window allows you to directly edit the request body/payload or convert your request between CURL and Python script. The complete parameters of the request body are listed in our API reference.
In the image below, check which options were selected in the Requests Builder to return an image of the easternmost part of the Belize Barrier Reef in the Caribbean Sea. The image is mosaicked with tiles from Sentinel-2 L2A within a time period between 1 June 2020 and 31 August 2020.
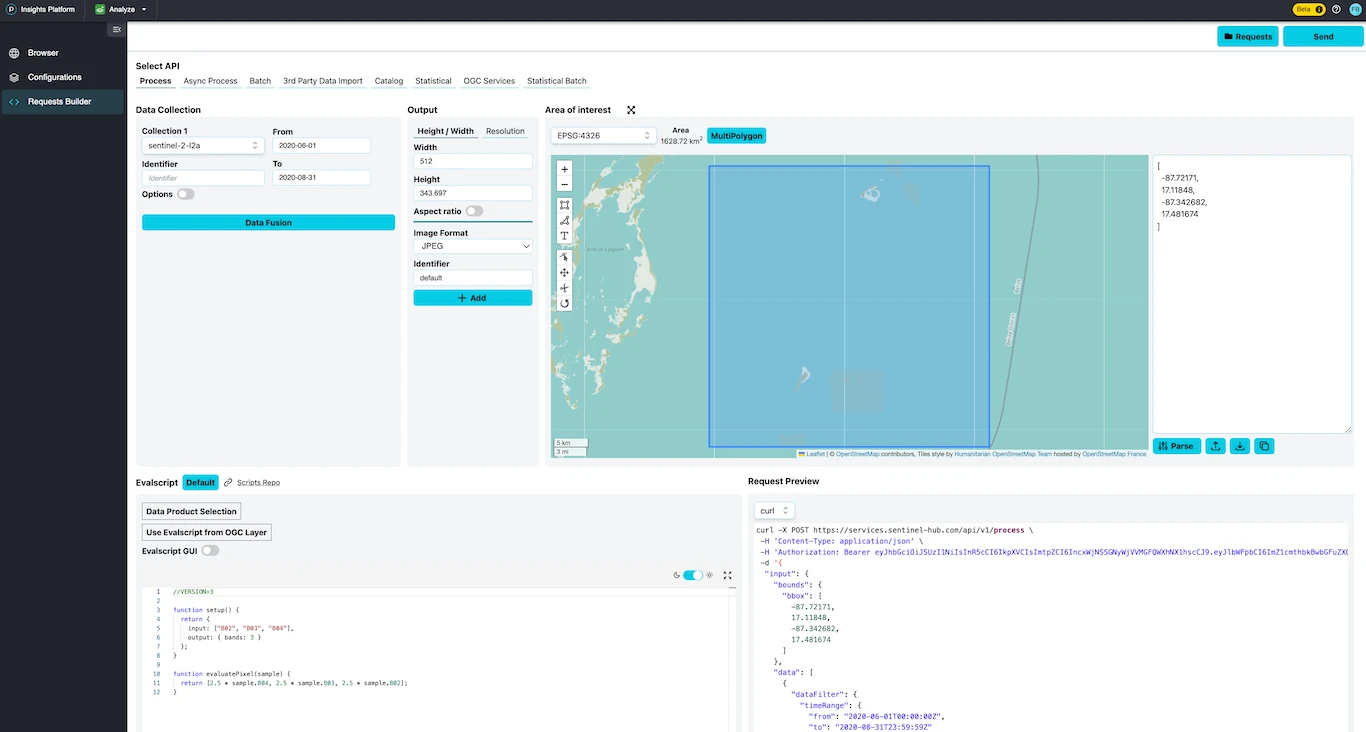
Lighthouse Reef Request
The following CURL request is the result of the user interface changes above - it is what you can read from the Request Preview window.
- CURL
curl -X POST https://services.sentinel-hub.com/process/v1 \
 -H 'Content-Type: application/json' \
 -H 'Authorization: Bearer <your access token>' \
 -d '{
  "input": {
    "bounds": {
      "bbox": [
        -87.72171,
        17.11848,
        -87.342682,
        17.481674
      ],
      "properties": {
        "crs": "http://www.opengis.net/def/crs/EPSG/0/4326"
      }
    },
    "data": [
      {
        "type": "S2L2A",
        "dataFilter": {
          "timeRange": {
            "from": "2020-06-01T00:00:00Z",
            "to": "2020-08-31T23:59:59Z"
          },
          "maxCloudCoverage": "1"
        }
      }
    ]
  },
  "output": {
    "width": 512,
    "height": 343.697,
    "responses": [
      {
        "identifier": "default",
        "format": {
          "type": "image/jpeg"
        }
      }
    ]
  },
  "evalscript": "//VERSION=3\n\nfunction setup() {\n  return {\n    input: [\"B02\", \"B03\", \"B04\"],\n    output: { bands: 3 }\n  };\n}\n\nfunction evaluatePixel(sample) {\n  return [2.5 * sample.B04, 2.5 * sample.B03, 2.5 * sample.B02];\n}"
}'
Search for Data with Catalog API
To find out which data is available for a given collection, Catalog API can be used. A common use-case is getting a list of acquisition dates in a given time-range, but Catalog can be used for more complex queries as well. The result of a search request with Catalog API is the metadata of all imagery in the library that matches the search query in a JSON format. By searching the data availability before requesting the data, users can avoid having empty data responses and make sure an empty data response is coming from other settings in the request. In this example, we will simply focus on getting a list of acquisitions for Sentinel-2 L1C in a time-range between June 1 and August 31, 2020.
Select API: Select CATALOG API.
In the Collections panel, select a collection under the Data Collection dropdown menu. By selecting a data collection, Requests Builder will automatically fetch the data for you. To see the full list of available collections, please refer to the documentation.
Time Range: Set your preferred time-range.
Area of Interest: Set your area of interest. Requests Builder allows you to insert a bounding box, upload KML/GeoJSON, or directly draw on the map to set the area of interest.
Request Options -> Limit: Limit is used to specify the number of results shown in one page. The default value is 10. After all the settings are set, click the Fetch button to search for data and see the result in the Catalog Results window.
In the Catalog Results window, search results will appear. By expanding one of them, we can inspect additional information about the acquisition.
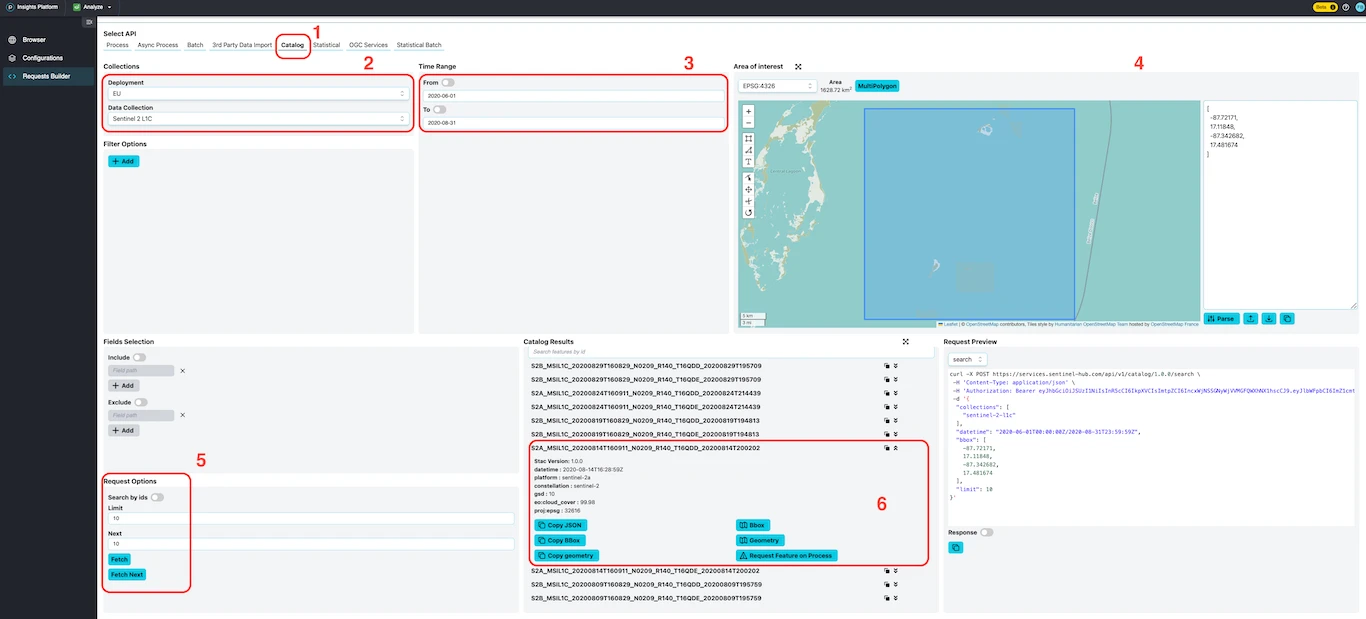
Catalog Search Results
In the Request Preview window, you can see how the Catalog request is constructed based on your chosen parameters. As before, you can copy the request into the window and click Parse.
- CURL
curl -X POST https://services.sentinel-hub.com/catalog/v1/search \
 -H 'Content-Type: application/json' \
 -H 'Authorization: Bearer <your access token>' \
 -d '{
  "collections": ["sentinel-2-l1c"],
  "datetime": "2020-06-01T00:00:00Z/2020-08-31T23:59:59Z",
  "bbox": [-87.72171,17.11848,-87.342682,17.481674],
  "limit": 10
}'
Get your Client Credentials
When making API requests in CMD CURL or Python, you will need to authenticate so the system can recognize you. This step is not required when using the Requests Builder because your credentials are automatically recognized once you are logged into your Planet account.
Requests are authenticated using an access token, which is generated from an OAuth client. To obtain an access token, you will need to provide your Client ID and Client Secret (strings of randomly generated characters).
Before you start, hover over the profile icon in the top right corner and click on My Profile & Settings to access your account settings. Then, go to the the Dashboard to access your linked account dashboard. To generate your Client ID and Client Secret, follow the steps in the Registering OAuth Client guide.
You will use the Client ID and Client Secret to access the APIs available through the Browser later.
Access tokens expire after 60 minutes. Make sure to request a new access token and replace it in your requests if yours has expired.
For full instructions on requesting a new access token, see the Authentication page.
CURL
CURL is a tool which sends requests through the command line interface (CLI). If you are using Windows 10, macOS, or Linux you probably already have it pre-installed. Otherwise you can install it here.
Authorization With Access Token
You can now get started with running CURL requests through your command line interface. The first thing you will do is use your Client ID and Client Secret to get an access token. The access token will be the way you identify yourself when making requests.
- Copy the CURL command below to a text editor:
- CURL
curl -X POST --url https://services.sentinel-hub.com/auth/realms/main/protocol/openid-connect/token --header "content-type: application/x-www-form-urlencoded" --data "grant_type=client_credentials&client_id=<your client id>" --data-urlencode "client_secret=<your client secret>"
-
Replace
<your client id>and<your client secret>with your own Client ID and Client Secret generated from the Dashboard. -
Paste the entire command set with your own client id and client secret to your command line interface and press enter. The response you get is the access_token which is a long string containing letters, numbers, and special characters as shown below. Make sure to save the
access_tokento a text editor for later.

Access‑Token Command‑Line Output
To make the above more clear, Client Secret and Client ID in the example above were pZRWxi2RDJ... and 2bf51f03-a0..., respectively. The access token is the long string between the two " signs. The resulting access token from the request above is:
eyJhbGciOiJSUzI1NiIsInR5cCIgOi...
Request an Image
- Copy any CURL request (for example the S2L2A true color image request example) to a text editor.
- Replace
<your access token>on top withaccess_tokenyou got from the previous request. When doing so, be careful not to add or delete any"and'signs.
The below CURL example is of Lighthouse Reef, with a code for image download added, but without the inserted access token.
- CURL
curl -X POST https://services.sentinel-hub.com/process/v1 \
  -H 'Authorization: Bearer <your_access_token>' \
  -F 'request={
    "input": {
        "bounds": {
            "properties": {
                "crs": "http://www.opengis.net/def/crs/OGC/1.3/CRS84"
            },
            "bbox": [-87.72171, 17.11848, -87.342682, 17.481674]
        },
        "data": [
            {
                "type": "S2L2A",
                "dataFilter": {
                    "timeRange": {
                        "from": "2020-06-01T00:00:00Z",
                        "to": "2020-08-31T23:59:59Z"
                    },
                    "maxCloudCoverage": "1"
                }
            }
        ]
    },
    "output": {
        "width": 1024,
        "height": 1024
    }
}' \
  -F 'evalscript=//VERSION=3

function setup() {
  return {
    input: ["B02", "B03", "B04"],
    output: {
      bands: 3,
      sampleType: "AUTO"
    }
  }
}

function evaluatePixel(sample) {
  return [2.5 * sample.B04, 2.5 * sample.B03, 2.5 * sample.B02]
}' \
  --output output.jpg
- After your access token is added to the request, paste the entire request to your command line interface and press enter.
The response will look similar to the one shown below, and your actual satellite image will be saved in the current working directory, where your command line interface is open.
If you are not sure which directory that is, you can type pwd into your command line interface and it will show you the output folder.
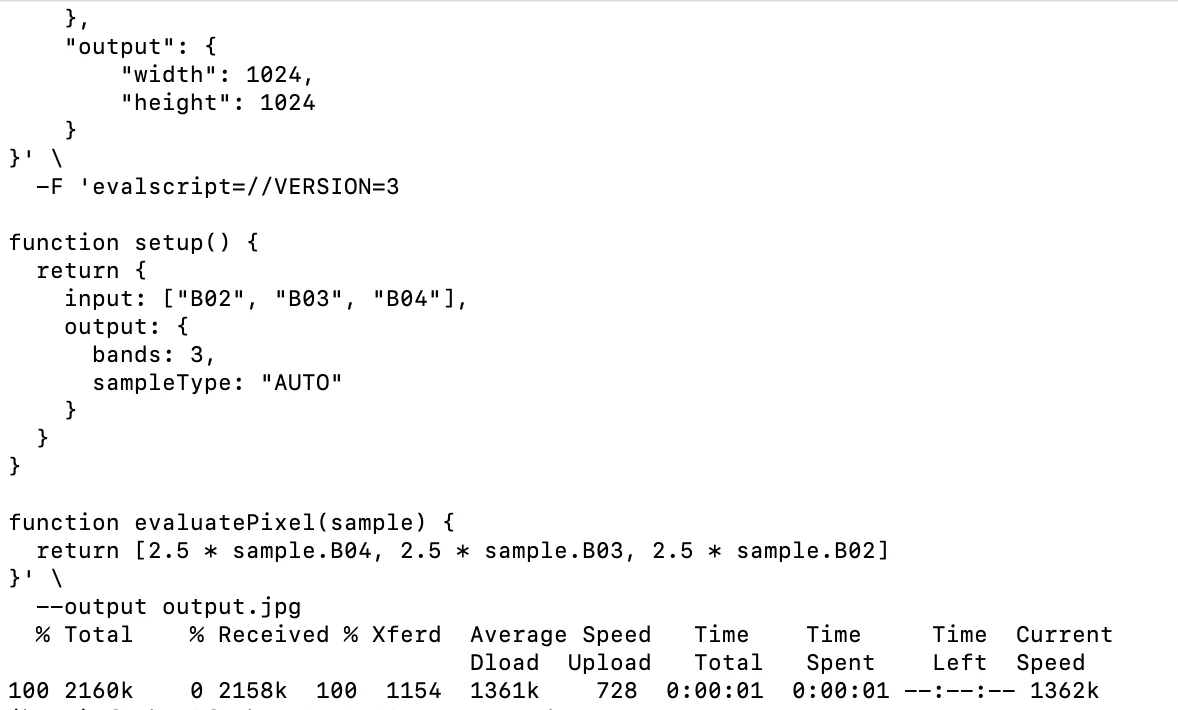
Image‑Request Response (CLI)
Search for Data with Catalog API
The following request will return 1 search result for Sentinel-2 L2A in a given AOI, within the time period 1.6.2020 - 31.8.2020.
- Copy the request example below and make sure to replace
<your access token>withaccess_tokenyou got from the authentication request. Instead of the following request, you can use any request from our Catalog examples.
- CURL
curl -X POST https://services.sentinel-hub.com/catalog/v1/search \
 -H 'Content-Type: application/json' \
 -H 'Authorization: Bearer <your access token>' \
 -d '{
  "collections": ["sentinel-2-l2a"],
  "datetime": "2020-06-01T00:00:00Z/2020-08-31T23:59:59Z",
  "bbox": [-87.72171,17.11848,-87.342682,17.481674],
  "limit": 1
}'
- Paste the request with the inserted access token to your CLI and press enter.
The result of the request should look something like this:
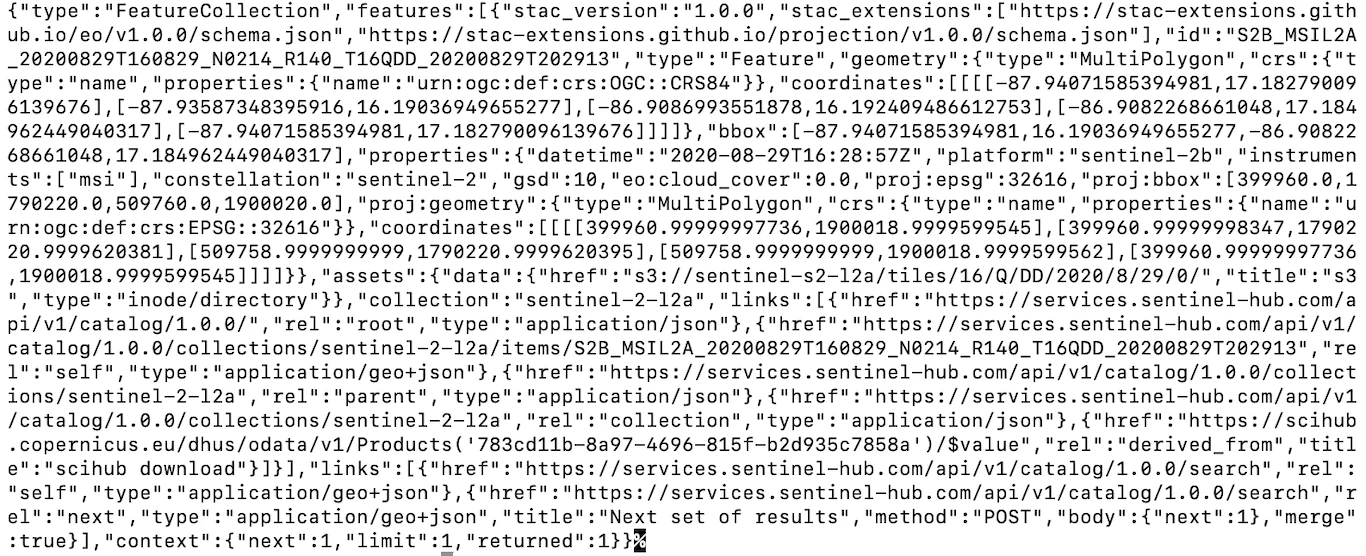
Catalog‑Request Response (CLI)
Adding > catalog-request.json at the end of the code above will download the response into a JSON file. To make it more readable, you might want to copy the response into an online JSON formatter.
- CURL
curl -X POST https://services.sentinel-hub.com/catalog/v1/search \
  -H 'Content-Type: application/json' \
  -H 'Authorization: Bearer <your access token>' \
  -d '{
    "collections": ["sentinel-2-l2a"],
    "datetime": "2020-06-01T00:00:00Z/2020-08-31T23:59:59Z",
    "bbox": [-87.72171, 17.11848, -87.342682, 17.481674],
    "limit": 1
}' > catalog-request.json
Python
Follow the steps below to set up Python and run API requests using the browser. To explore real use cases and example scripts, visit our GitHub repository for notebook samples. You will also find a variety of tutorials and example workflows demonstrating how to interact with available APIs and process Earth Observation (EO) data using Python.
Python 3.6 or newer is required to run the examples. If you do not have Jupyter installed locally, you can easily set it up by following the instructions on the official Jupyter installation page. This will allow you to run example scripts and workflows in your own environment.
If you are not familiar with Jupyter Notebook, see this beginner tutorial to learn how to use it.
Most importantly: the cells are run with Ctrl+Enter (Windows/Linux) or Cmd+Enter (Mac). Note that you need to run each cell separately in top-to-bottom order.
Make a Request
The steps below were collected in a Jupyter Notebook, that you can import into your Jupyter Notebook by clicking Upload. Each step, as well as how to construct a Python body request, is explained below.
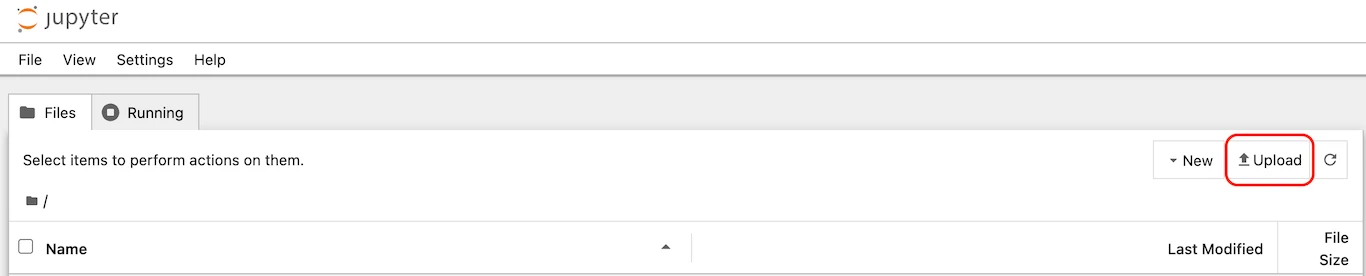
Upload Notebook
1. Import requisite packages
Copy these imports to your Jupyter Notebook to import all the needed libraries.
- Python SDK
from oauthlib.oauth2 import BackendApplicationClient
from requests_oauthlib import OAuth2Session
from PIL import Image
import io
import numpy as np
import matplotlib.pyplot as plt
2. Authentication
Add this code to your notebook next, and replace <your client id> and <your client secret> inside the quotation marks with your client id and client secret:
- Python SDK
CLIENT_ID = "<your client id>"
CLIENT_SECRET = "<your client secret>"
For example:
- Python SDK
CLIENT_ID = "ed05a0e6-9aec-4d5a-aaf8-af07333760b8"
CLIENT_SECRET = "}m%>Zt/9E5+EPsT_zY-y^2(vi-,c*G>L-)p)dj75"
The following code will set up credentials for use with our APIs and get an authentication token (no need to change anything here, just copy this code to your Notebook next).
- Python SDK
# set up credentials
client = BackendApplicationClient(client_id=CLIENT_ID)
oauth = OAuth2Session(client=client)

# get an authentication token
token = oauth.fetch_token(token_url='https://services.sentinel-hub.com/auth/realms/main/protocol/openid-connect/token',
                          client_secret=CLIENT_SECRET, include_client_id=True)
3. Set the parameters for the image request
The variable parameters are set here and referenced in the request below. This way, it is easy for you to edit the BBOX, time-range or collection type.
bbox: Find the bounding box of your AOI via our Requests Builderstart_dateandend_date: these are your time interval start and end dates. Fill them in using this format: 'YYYY-MM-DD'collection_id: Choose a data collection and look up its collection identifier at the bottom of the page; for example, for Sentinel-2 L2A, the identifier issentinel-2-l2a.
- Python SDK
bbox = [-87.72171, 17.11848, -87.342682, 17.481674]
start_date = "2020-06-01"
end_date = "2020-08-31"
collection_id = "sentinel-2-l2a"
4. Create an evalscript and request body/payload
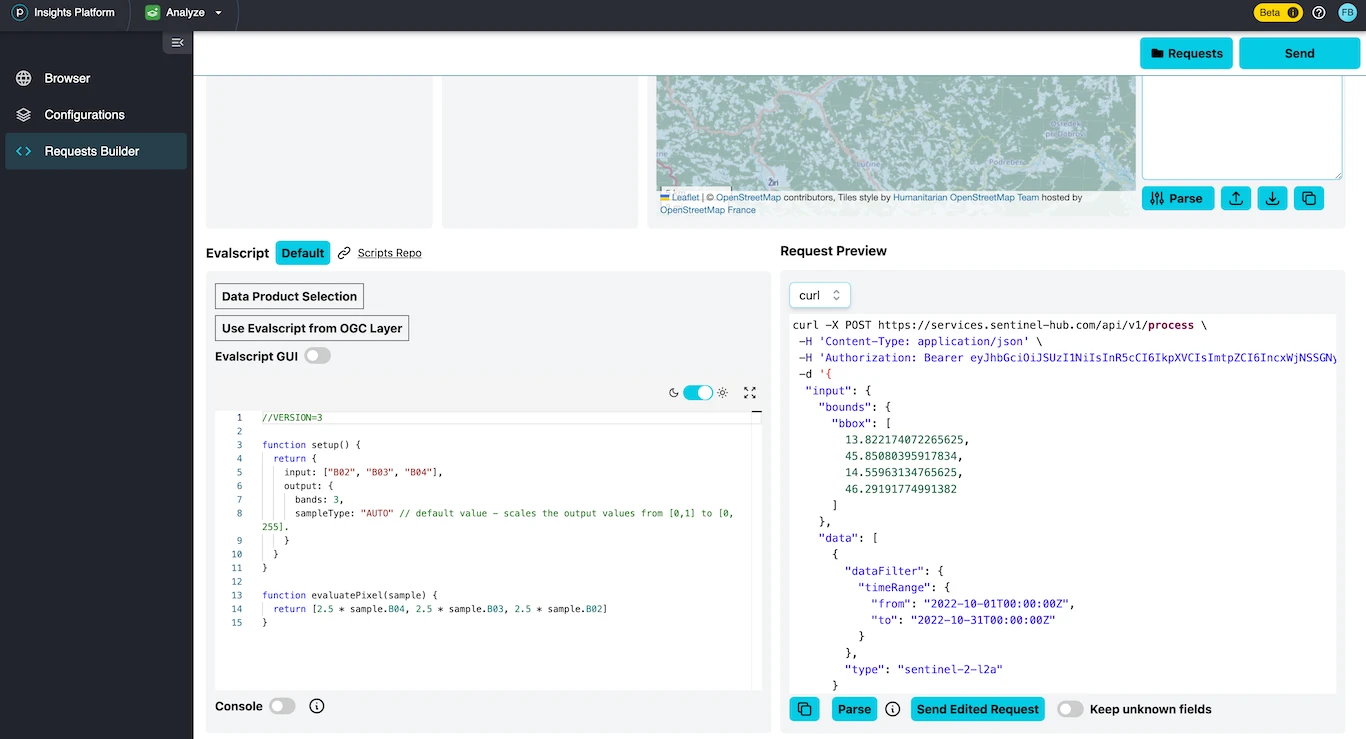
It is easy to get an evalscript and request body payload for Python from any CURL request. The best way to do it is to parse the request in Requests Builder, then grab the relevant parts and copy them into Python code.
- First, check the chapter of Requests builder called Run the example request from documentation to see how to grab any example from our documentation and parse it.
- When the request is parsed, copy the evalscript from Requests Builder (Image below (1)) and paste it into the following code, replacing the
<copied evalscript>part. Note that the evalscript goes between two triple quotes""", which signify a multiline comment in Python.
- Python SDK
evalscript = """
<copied evalscript>
"""
Let us use a simple true color composite visualization from this example. After adding it, the Python code should look like this:
- Python SDK
evalscript = """
//VERSION=3
function setup() {
  return {
    input: ["B02", "B03", "B04"],
    output: {
      bands: 3,
      sampleType: "AUTO" // default value - scales the output values from [0,1] to [0,255].
    }
  }
}

function evaluatePixel(sample) {
  return [2.5 * sample.B04, 2.5 * sample.B03, 2.5 * sample.B02]
}
"""
- In Requests Builder Request Preview, select body from the dropdown menu (2).
- Copy the code from Request Preview, but only up to a comma before evalscript, so the "evalscript" is excluded, and a comma included, as demonstrated in orange on the image below (3).
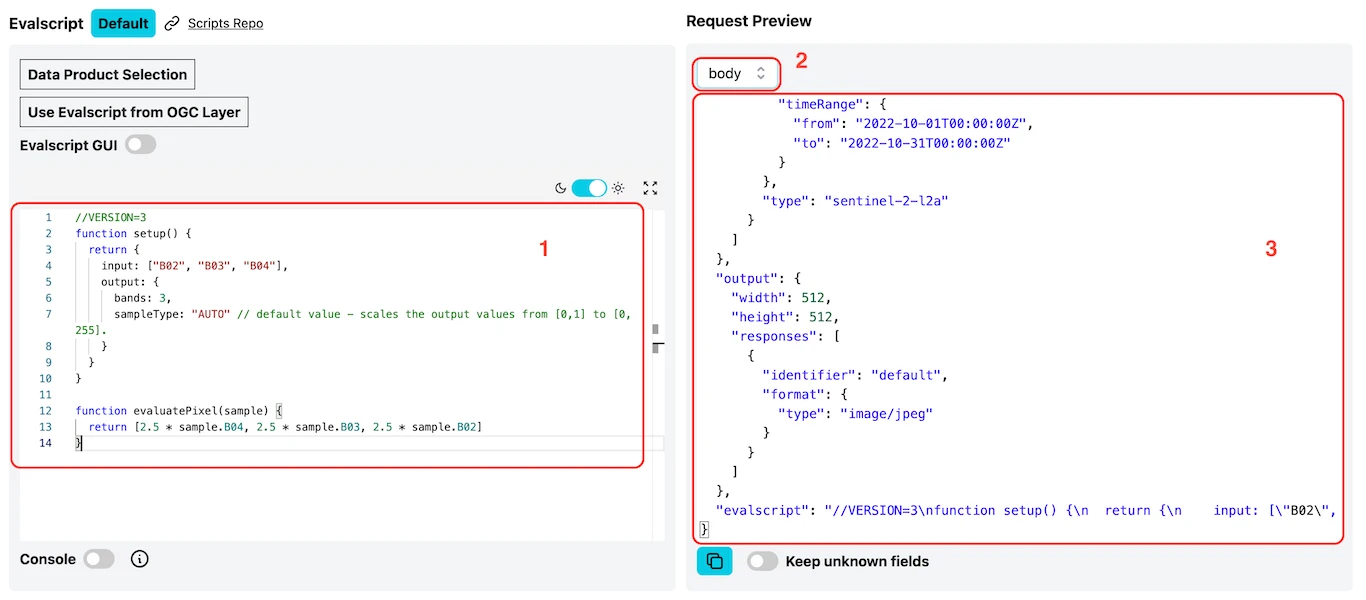
Request Preview Highlight
- Use the copied request to replace the
<copied payload>in the following Python code:
- Python SDK
json_request = <copied payload>
"evalscript": evalscript
}
Using the CURL request body for Lighthouse Reef, the result would look like this:
- Python SDK
json_request = {
  "input": {
    "bounds": {
      "bbox": [
        -87.72171,
        17.11848,
        -87.342682,
        17.481674
      ]
    },
    "data": [
      {
        "dataFilter": {
          "timeRange": {
            "from": "2020-06-01T00:00:00Z",
            "to": "2020-08-31T23:59:59Z"
          },
          "maxCloudCoverage": "1"
        },
        "type": "sentinel-2-l2a"
      }
    ]
  },
  "output": {
    "width": 1024,
    "height": 1026.707,
    "responses": [
      {
        "identifier": "default",
        "format": {
          "type": "image/jpeg"
        }
      }
    ]
  },
"evalscript": evalscript
}
Putting both, evalscript and request body together, the final Python request would look like this:
- Python SDK
# evalscript
evalscript = """
//VERSION=3

function setup() {
  return {
    input: ["B02", "B03", "B04"],
    output: { id: 'default',
              bands: 3 }
  };
}

function evaluatePixel(sample) {
  return [2.5 * sample.B04, 2.5 * sample.B03, 2.5 * sample.B02];
}
"""

# request body/payload
json_request = {
    'input': {
        'bounds': {
            'bbox': bbox,
            'properties': {
                'crs': 'http://www.opengis.net/def/crs/OGC/1.3/CRS84'
            }
        },
        'data': [
            {
                'type': 'S2L2A',
                'dataFilter': {
                    'timeRange': {
                        'from': f'{start_date}T00:00:00Z',
                        'to': f'{end_date}T23:59:59Z'
                    },
                    'mosaickingOrder': 'leastCC',
                },
            }
        ]
    },
    'output': {
        'width': 1024,
        'height': 1024,
        'responses': [
            {
                'identifier': 'default',
                'format': {
                    'type': 'image/jpeg',
                }
            }
        ]
    },
    'evalscript': evalscript
}
5. Set the request url and headers for the Processing API and send the request
The following code will specify the Processing API endpoint, set up headers and send the request.
In this step, the request will be executed, but the results won't yet be displayed.
If you are using Processing API, you can leave this part as is, otherwise you will need to edit the endpoint (/process/v1 in the url_request lets Python know that Processing API is being used).
- Python SDK
# Set the request url and headers
url_request = 'https://services.sentinel-hub.com/process/v1'
headers_request = {
    "Authorization" : "Bearer %s" %token['access_token']
}

#Send the request
response = oauth.request(
    "POST", url_request, headers=headers_request, json = json_request
)
Display the Requested Image
- Get the image array and plot the image
When the request above is successful, this piece of code will display a requested image (in this case, the image of Lighthouse Reef).
You may paste this code in as is, and you can edit the image size by changing the figsize numbers.
- Python SDK
# read the image as numpy array
image_arr = np.array(Image.open(io.BytesIO(response.content)))

# plot the image for visualization
plt.figure(figsize=(16,16))
plt.axis('off')
plt.tight_layout()
plt.imshow(image_arr)
Search for Available Data With Catalog API
- Import requisite packages, authenticate, and set parameters
Follow the steps 1, 2 and 3 of the Make a request section for Python. If your Notebook already includes these from requesting an image, there is no need to add them again.
- Create the request body/payload
The Catalog request below will return all the available acquisitions that match the specified parameters - time-range, collection, bbox and the number of results.
These parameters were already defined above, in Make a Request - point 3, and are being referenced here again.
Defining the parameters separately makes it easy to quickly change them (for example, change the bbox) without the need to edit every request.
You could of course specify them again.
- Python SDK
json_search = {
    'bbox': bbox,
    'datetime': f'{start_date}T00:00:00Z/{end_date}T23:59:59Z',
    'collections': [collection_id],
    'limit': 1
}
Instead of this request, we could easily use any Catalog request from documentation, such this one. As Catalog examples are written in Python, they can be copied as they are.
- Set the endpoint and send the request
The following code will specify the endpoint for Catalog API, set up headers and send the request.
Note that the endpoints differ for each API - for example, Catalog API has /catalog/search in URL, while Processing API has /process.
This is how the system knows which API you are using.
In this step, the request will be executed, but the results will not yet be displayed.
- Python SDK
# set the url and headers
url_search = 'https://services.sentinel-hub.com/catalog/v1/search'
headers_search = {
  'Content-Type': 'application/json'
}

# send the request
response_search = oauth.request(
    "POST", url_search, headers=headers_search, json = json_search
)
- Print the search result
The following code will print the result of the Catalog search in JSON format.
- Python SDK
response_search.json()
The JSON result will look something like this. As the search was limited to only 1 result, you can see how the Catalog response looks like for a single acquisition.
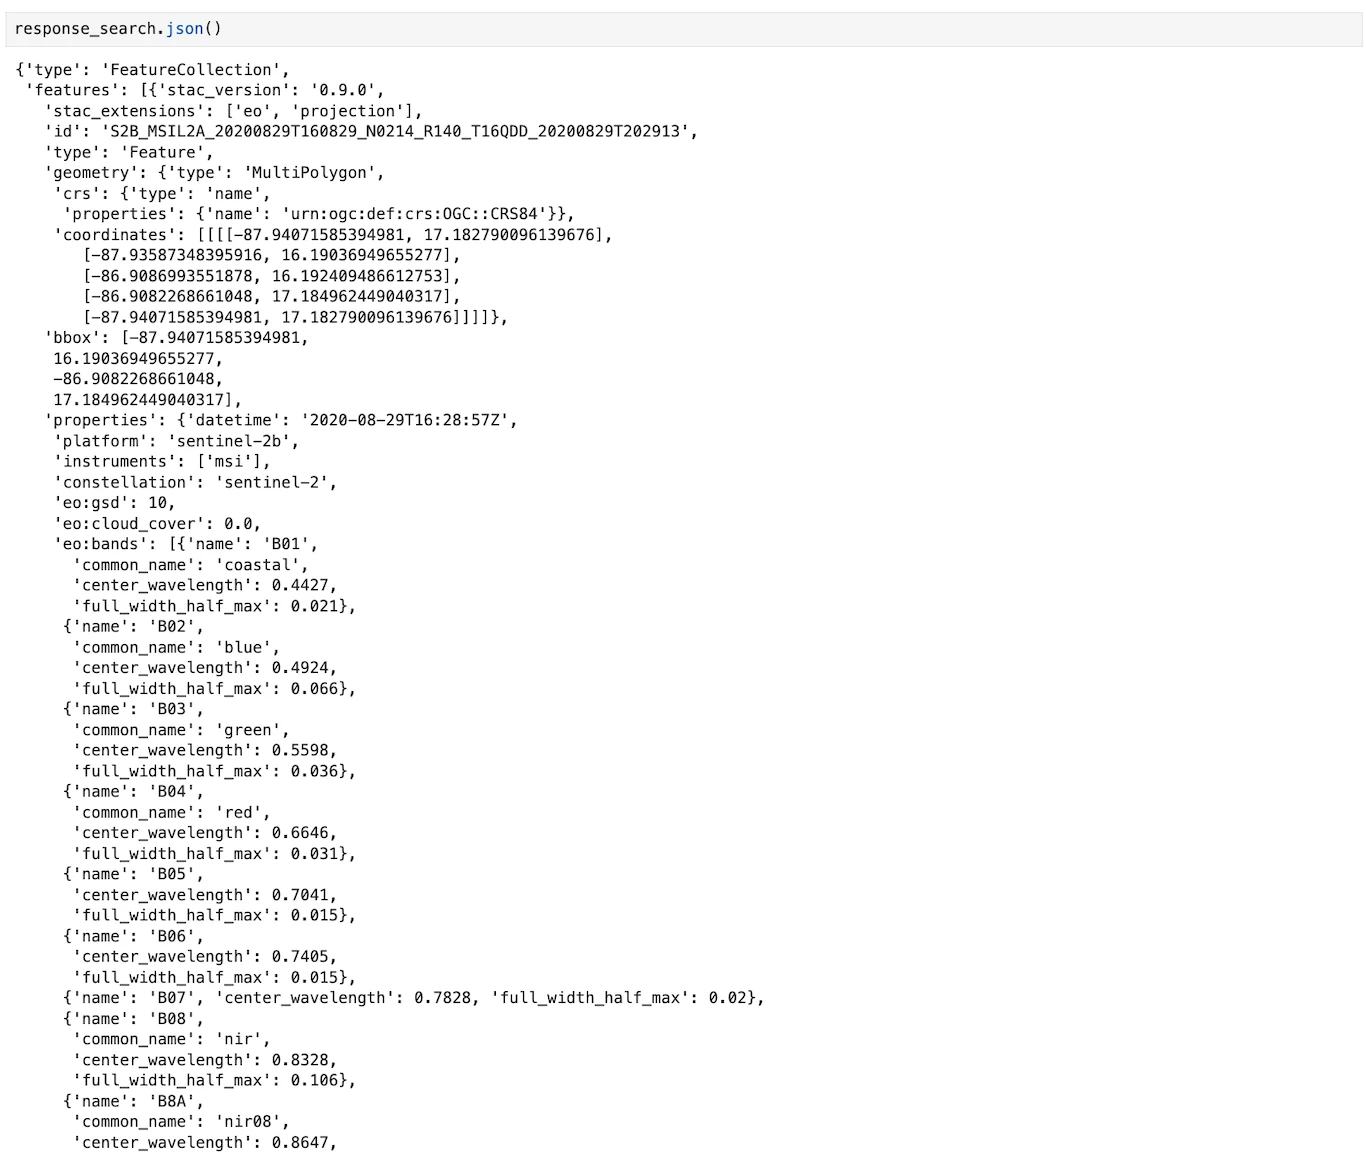
Catalog Output in Notebook