Copy for LLM[View as Markdown](https://docs.planet.com/data/area-monitoring/applications/admin-application/)
# Admin Application
## Overview
The **Admin Application** provides a centralized place to:
* check the status of the area monitoring system
* create and configure scopes
* configure area monitoring system components (for example, the reference data, the signals, the markers and the traffic light system) for a specific scope.
Therefore, this user guide assumes that:
* you have a solid understanding of the [Area Monitoring](https://docs.planet.com/data/area-monitoring.md).
* you have been granted access to the **Admin Application**.
Once you are logged in you will see the below user interface.
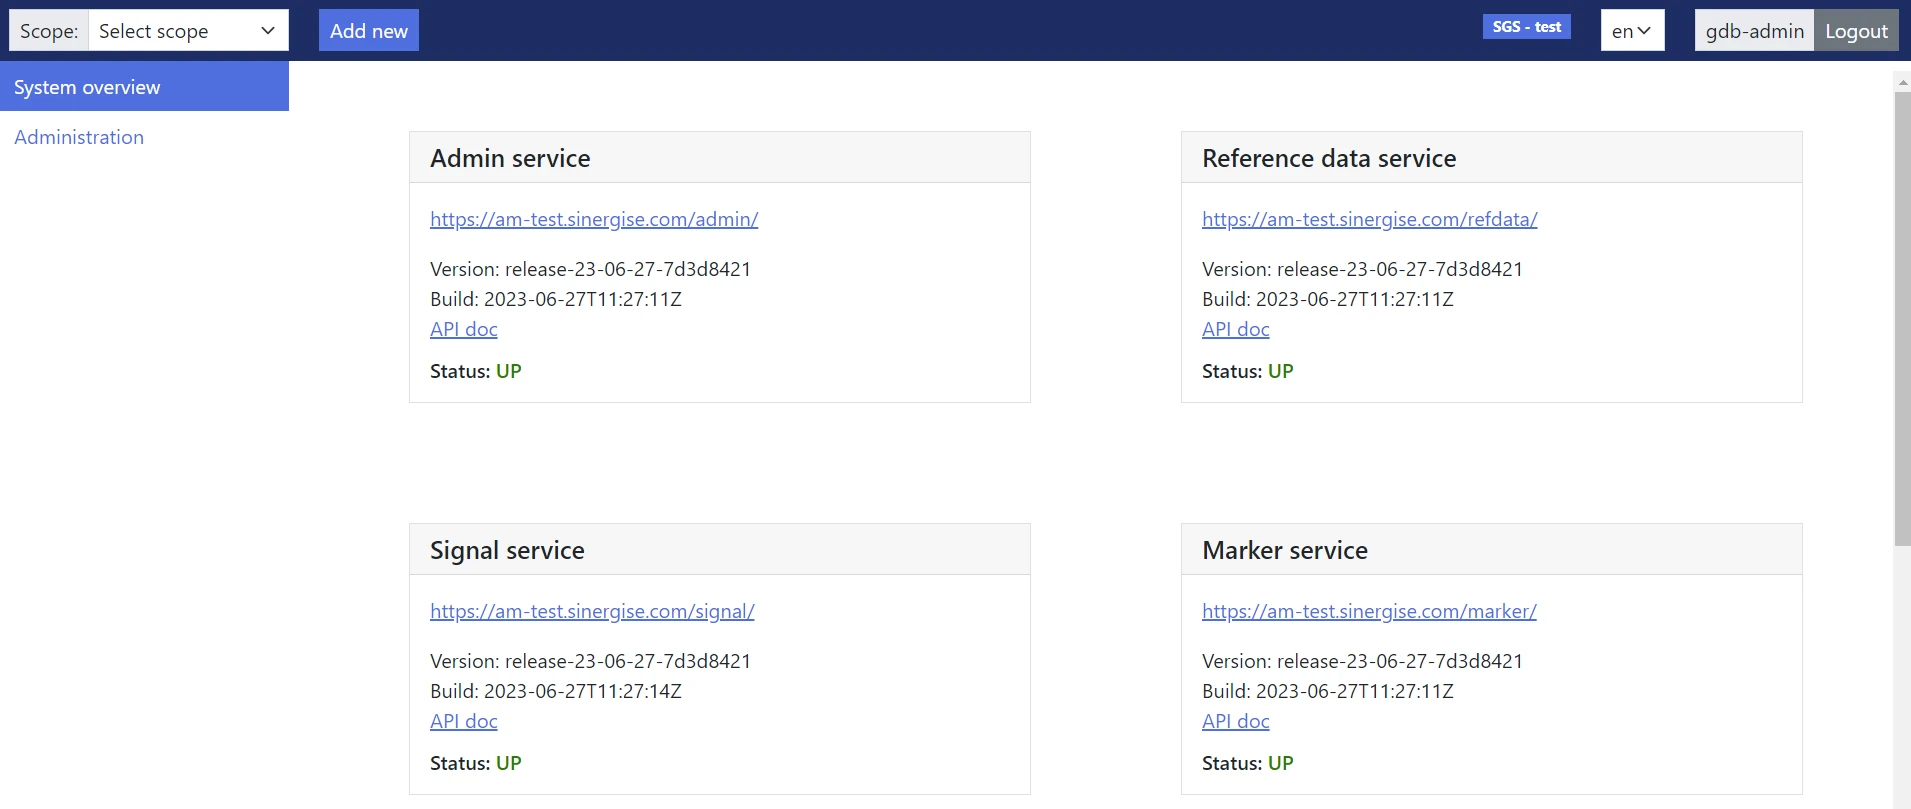
The **Admin Application** user interface consists of the following components:
| Name | Description |
| ----------------------------------------- | ------------------------------------------------------------------------------------------------------------------------------------------------------------------------------------------------------------------------------------------------------------------------------------------------------------------ |
| **Drop-down arrow** next to the **Scope** | Allows you to view a list of scopes you have access to. Selecting a scope will expose the conditional sections. |
| **Add new** button | Allows you to [create a scope](#create-a-scope). |
| **System overview** section | Shows the following details about the services that are part of Area Monitoring [applications](https://docs.planet.com/data/area-monitoring/applications.md): service name, base URL, version information, build information, API documentation presented as a hyperlink and status information. |
| **Administration** section | Allows you to:
- [provide](#credentials) the credentials that will be used to access to the secured S3 bucket that you created
- [provide](#credentials) the Sentinel Hub **Client ID** and **Client Secret**
- [manage the configurations](#configuration) of different applications and services. |
| **Scope Configuration** section | Shows details about the selected scope. |
| **Reference Data** section | Allows you to [manage the Code lists](#code-lists) listed in this section and to [import the reference data](#import-reference-data-from-a-geopackage-file). |
| **Signal** section | Allows you to [manage the Code lists](#code-lists) listed in this section and to [configure the subscriptions](#subscription) for signals retrieval. |
| **Marker** section | Allows you to [manage the Code list](#code-lists) listed in this section. |
| **Traffic light** section | Allows you to [manage the Code lists](#code-lists) listed in this section. |
## Create a scope
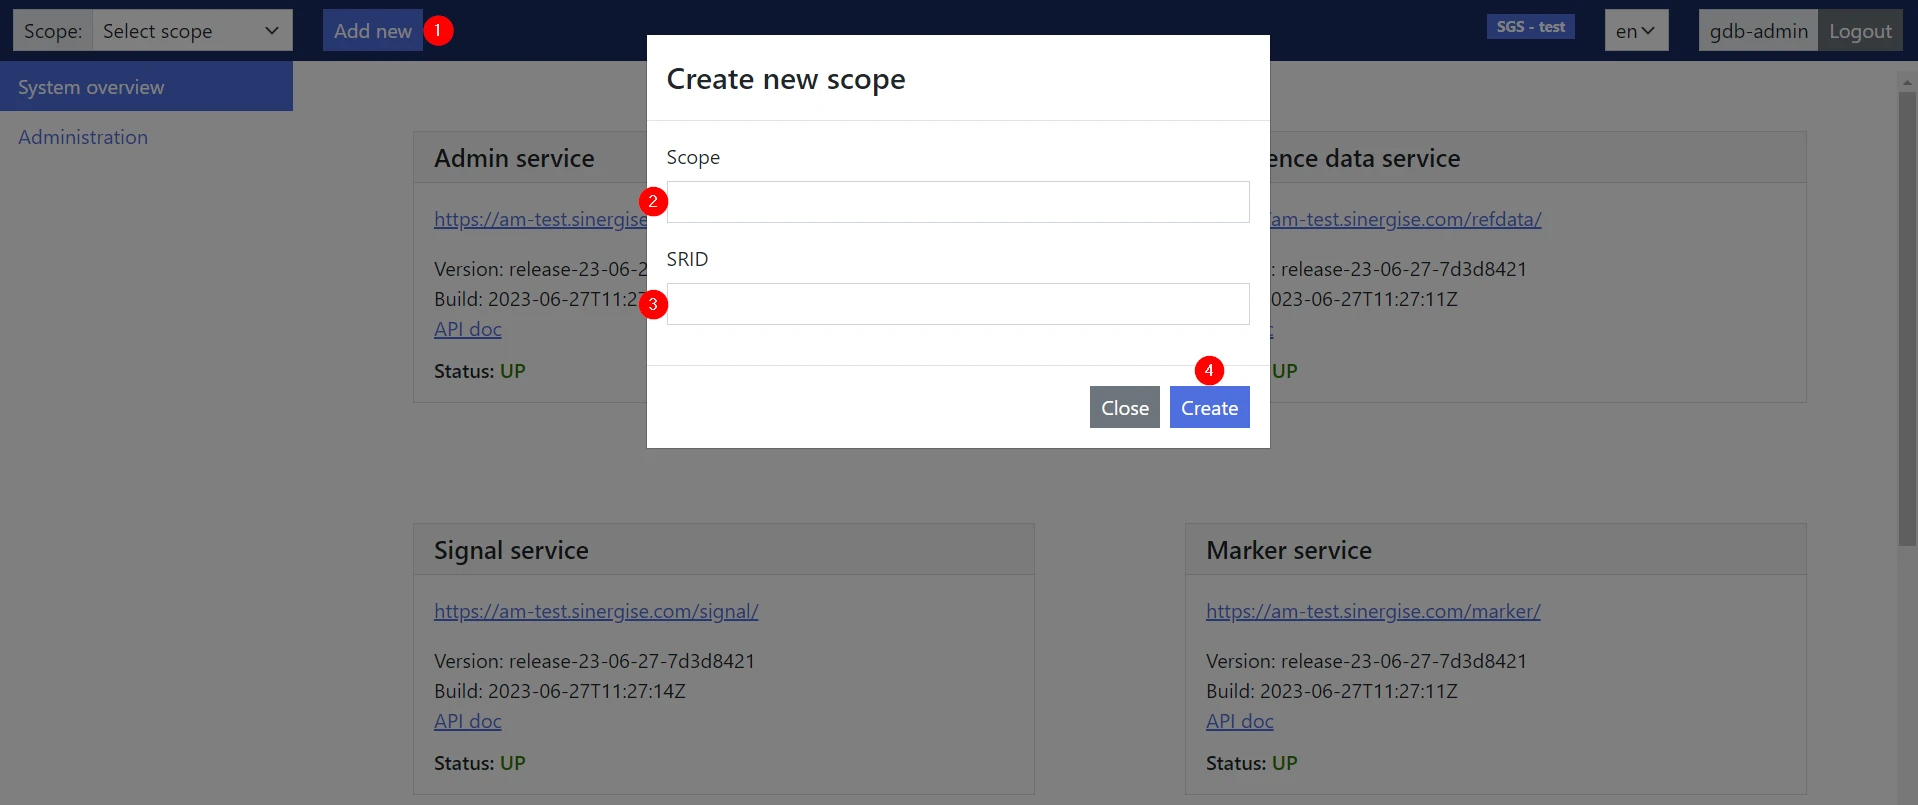
1. Click **Add new**.
2. In the **Scope** field, enter the [scope ID](https://docs.planet.com/data/area-monitoring/common.md#scope).
> The entered scope ID should match the scope specified in the GeoPackage file from which you will import the reference data.
3. In the **SRID** field, enter the SRID (spatial reference identifier) data, which is an EPSG code.
> The entered EPSG code should match the EPSG code specified in the GeoPackage file from which you will import the reference data.
4. Click **Create**.
## Credentials
This feature enables you to provide:
* the S3 credentials that will be used to access the bucket that you created
* the Sentinel Hub **Client ID** and **Client Secret**.
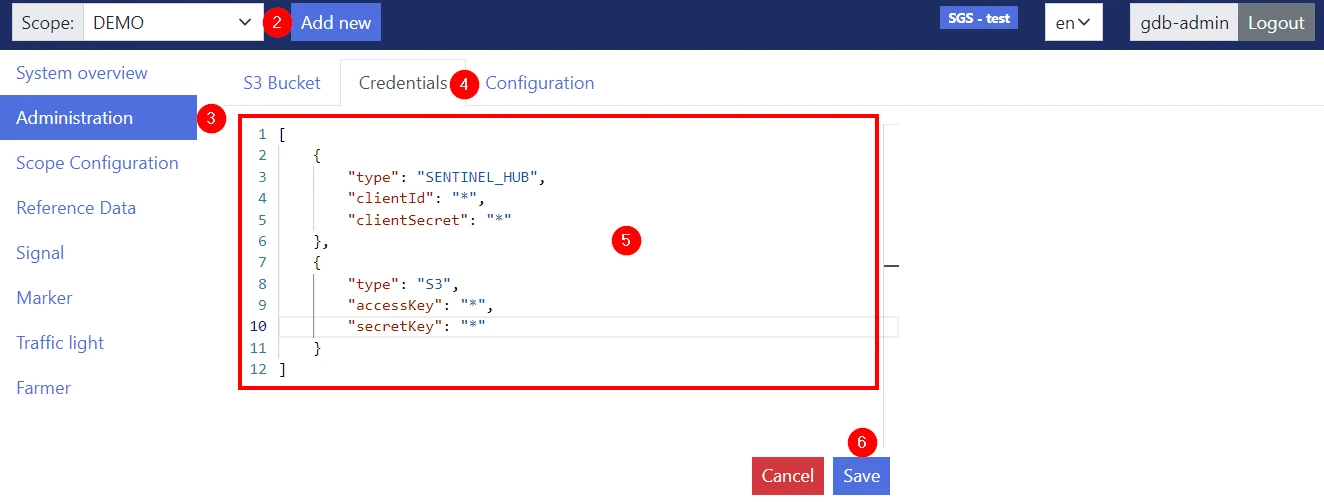
1. Get your Sentinel Hub **Client ID** and **Client Secret**. For more information about how to get your Sentinel Hub **Client ID** and **Client Secret** please check [these instructions](https://docs.planet.com/guides/beginners-guide.md#get-your-client-credentials) or [this part of the tutorial video](https://www.youtube.com/watch?v=CBIlTOl2po4\&t=1760s).
2. Select the appropriate **Scope**.
3. Go to the **Administration** section.
4. Go to the **Credentials** tab.
5. Enter the S3 bucket credentials, the Sentinel Hub **Client ID** and **Client Secret** in JSON format.
6. Click **Save**.
## Configuration
This feature enables you to [create](#create-a-configuration) and [edit](#edit-a-configuration) the configurations of different applications and services.
### Create a configuration
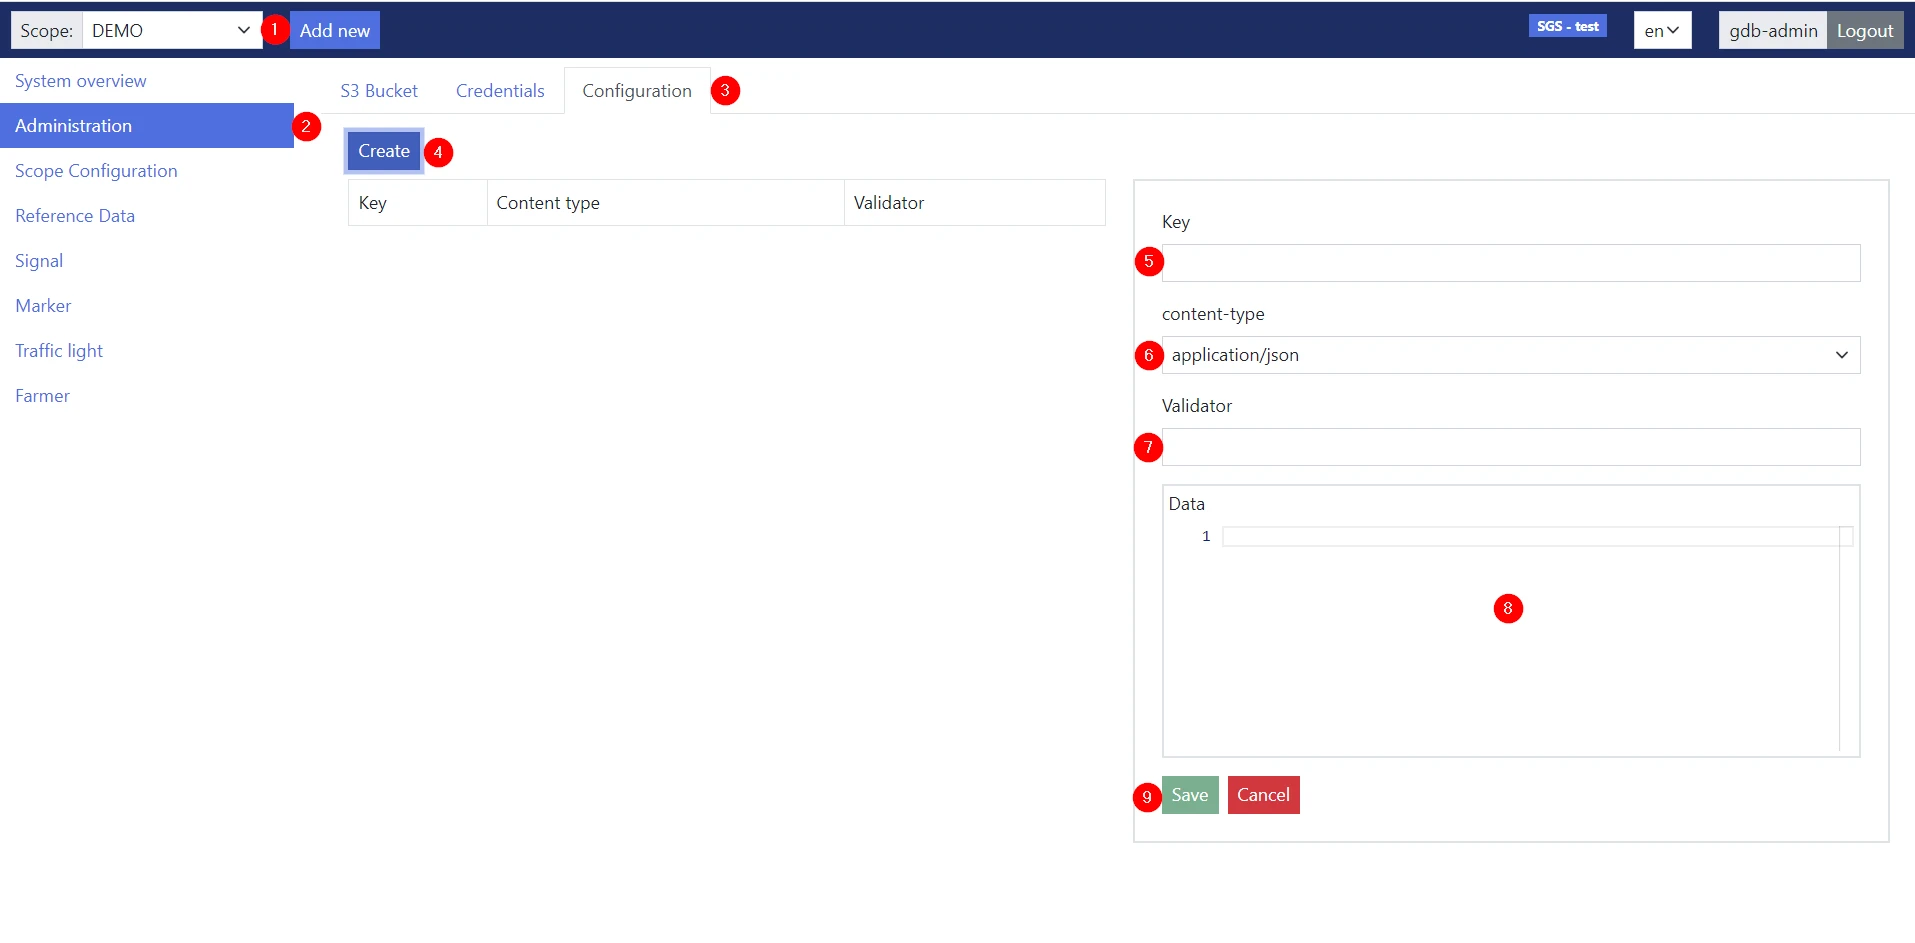
1. Select the appropriate **Scope**.
2. Go to the **Administration** section.
3. Go to the **Configuration** tab.
4. Click **Create**.
5. In the **Key** field, enter a key.
6. Choose a content type from the drop-down menu.
7. In the **Validator** field, specify a validator.
8. Enter the configuration data.
9. Click **Save**.
### Edit a configuration
1. Select the appropriate **Scope**.
2. Go to the **Administration** section.
3. Go to the **Configuration** tab.
4. Click on the details of the desired configuration.
5. Edit any of the other editable fields that display. See [Create a configuration](#create-a-configuration) for an explanation of the fields.
6. Click **Save**.
## Code lists
Managing Code lists include actions such as [adding](#add-code-list-records) records to a Code List, [modifying](#edit-a-code-list-record) the record details and [deleting](#delete-a-code-list-record) records from a Code List.
### Add code list records
You can add records to a Code list using:
* [JSON](#add-a-code-list-record-using-json)
* [templates](#add-code-list-records-using-templates)
* [CSV file](#add-code-list-records-using-a-csv-file)
#### Add a code list record using JSON
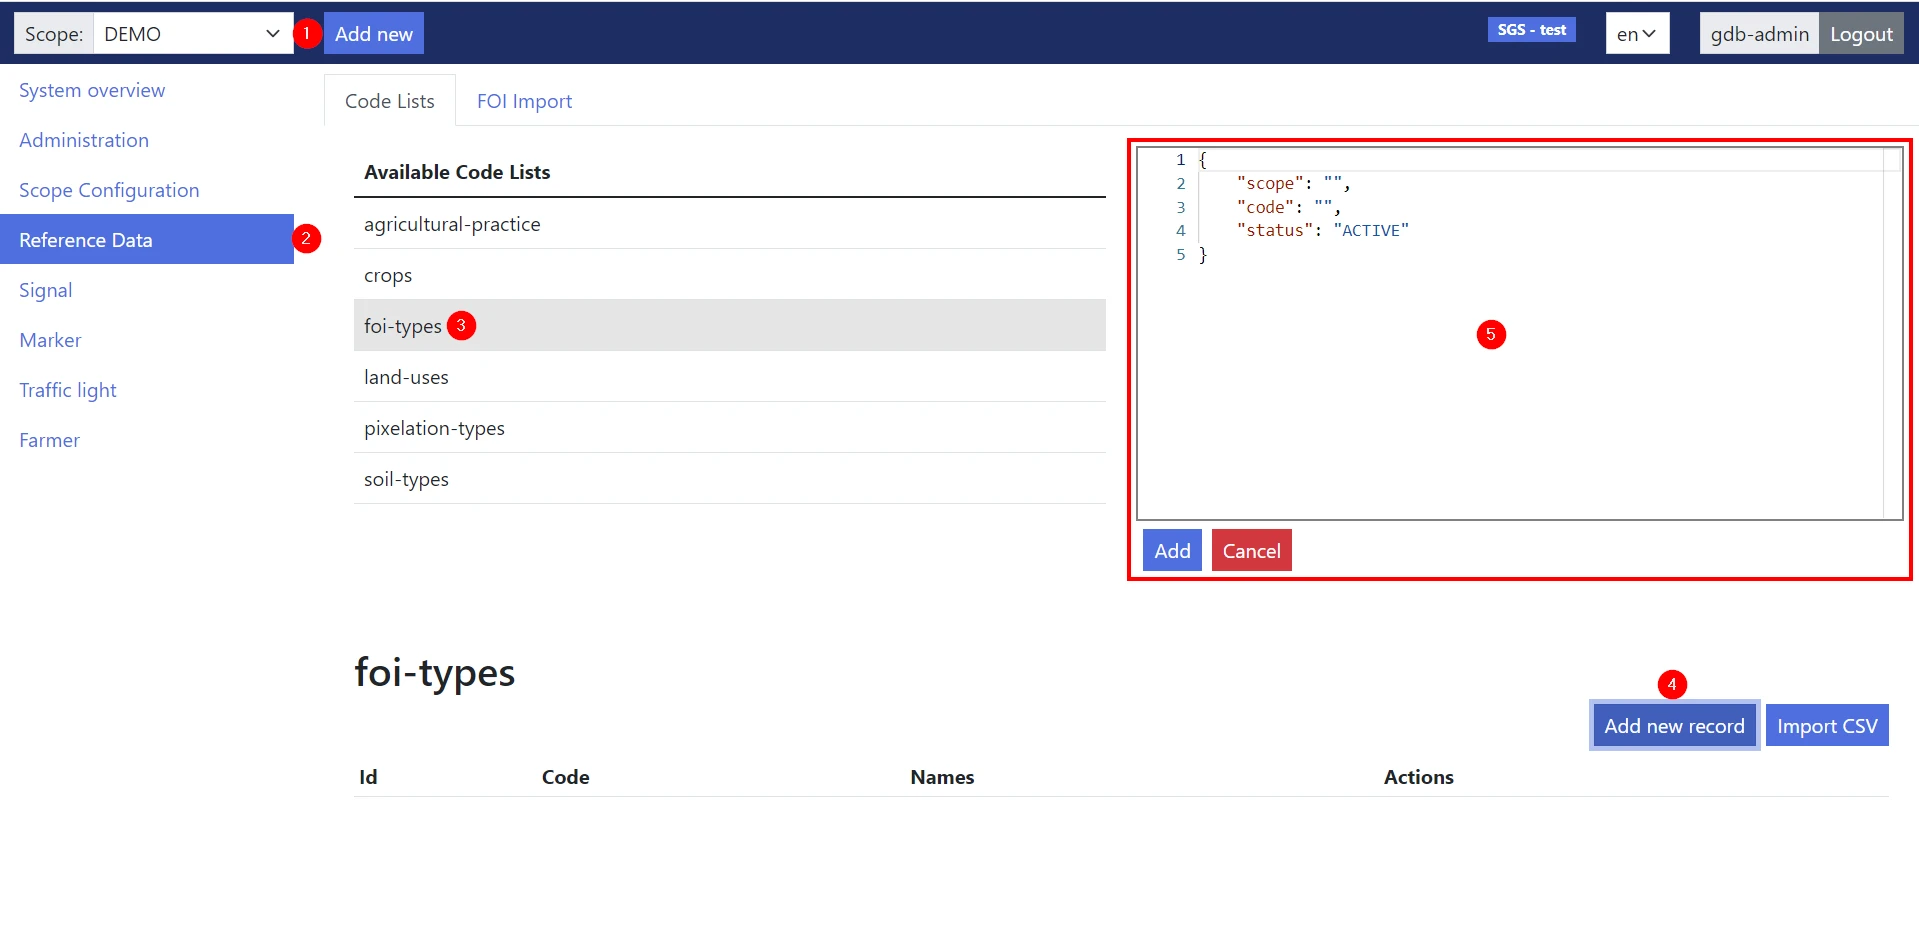
1. Select the appropriate **Scope**.
2. Go to the **Reference Data** | **Signal** | **Marker** | **Traffic light** section.
3. In the **Code Lists** tab, click on the desired Code list title.
4. Click **Add new record**.
5. Enter the record data in JSON format and click **Add**.
note
Note that a JSON key represents a header row value in a CSV file (see [Add code list records using a CSV file](#add-code-list-records-using-a-csv-file) for more details).
#### Add code list records using templates
In the sections **Signal** and **Marker** you can use templates to populate in bulk the records of the Code lists with data from predifined Code list templates for each Sentinel Hub (SH) collection.
> Any template from the **Signal** section populates the following dependent Code lists:
* `sh-collection-types` listed in **Code Lists** tab from the **Signal** section
* `signal-types` listed in **Code Lists** tab from the **Signal** section
* `pixelation-types` listed in the **Code Lists** tab from the **Reference Data** section.
> Any template from the **Marker** section populates the `marker-types` Code list listed in the **Code Lists** tab from this section.
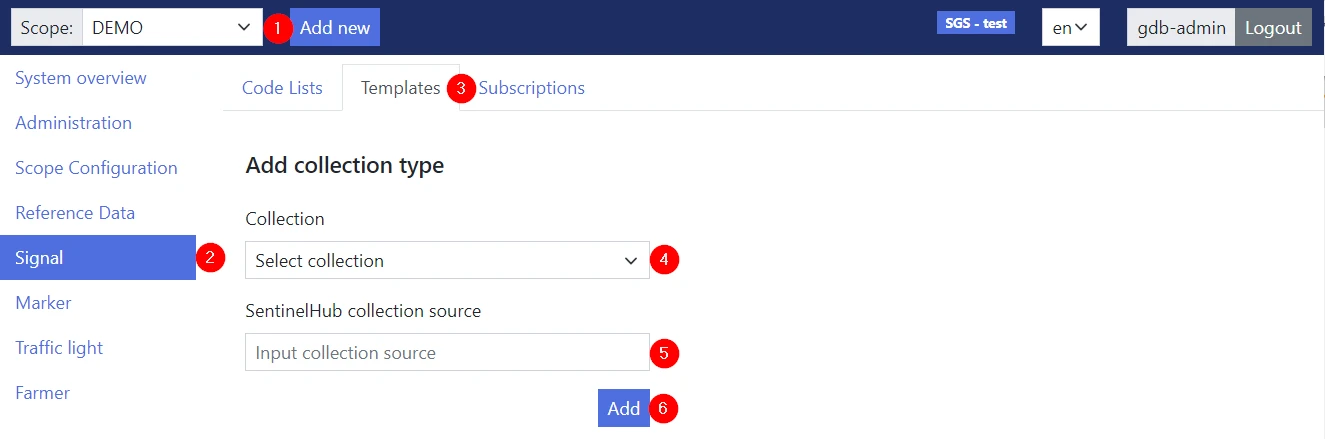
1. Select the appropriate **Scope**.
2. Go to the **Signal** | **Marker** section.
3. Go to the **Templates** tab.
4. Choose a collection from the drop-down menu.
> In the drop-down menu from the **Signal** section are listed the collections types which are not included in the `sh-collection-types` Code list.
>
> In the drop-down menu from the **Marker** section will be listed the collections which are included in the `sh-collection-types` Code list.
5. In the **SentinelHub collection source** field, enter the BYOC collection source if this was not auto-populated.
6. Click **Add**.
#### Add code list records using a CSV file
You can use a comma-separated values (CSV) file that contains information about the new Code list records you want to create in bulk.
note
Note that we recommend this method for adding records for the following code lists: `crops`, `agricultural-practice`, `foi-types`, `land-uses`, `schemes`, `soil-types`, `traffic-light-colours`, `decisions`, `event-types`, `judgement-reasons` and `lanes`.
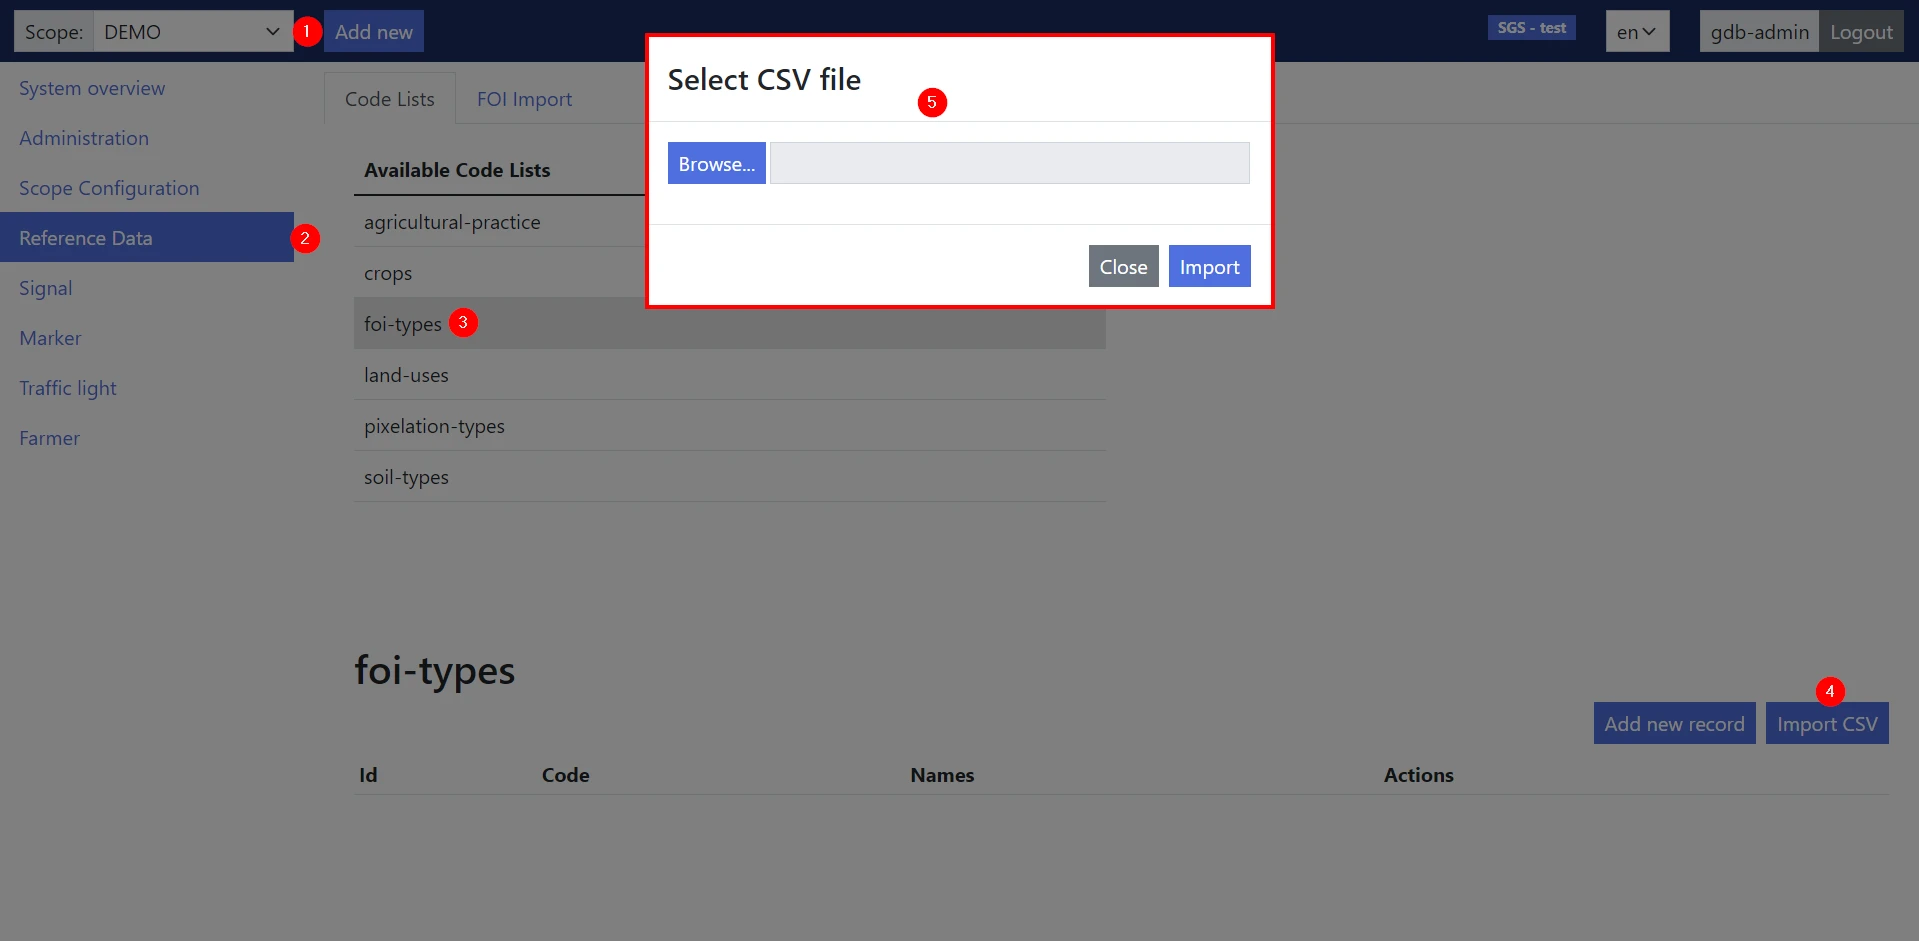
1. Select the appropriate **Scope**.
2. Go to the **Reference Data** | **Signal** | **Marker** | **Traffic light** section.
3. In the **Code Lists** tab, click on the desired Code list title.
4. Click **Import CSV**.
5. In the **Select CSV file** pop-up window, click **Browse**, choose the CSV file and click **Import**.
To successfully import a CSV, the content must adhere to these rules:
* The CSV file must consist of a header row that names the columns and multiple rows of values that are separated by semicolons (;) (or other characters).
* Each row of values is a Code list record.
* Header row values must match the field values listed in the below CSV file requirements that are provided for the Code lists for which the recommended method to add records is via a CSV file.
* Header row values are not required to be in the order listed, just make sure that the column header is over the appropriate information in each respective column.
**The CSV file requirements** for the code lists for which the recommended method to add records is via a CSV file:
| Field | Data type | Required | Description | Code List |
| ---------------------- | --------- | -------- | ------------------------------------------------------------------------------------------------------------------------------------------------------------------------------------------------------------------------------------------------------------------------------------------------ | ---------------------------------------------------------------------------------------------------------------------------------------------------------------------- |
| `code` | string | YES | Record's short unique code (use uppercase letters `[A-Z]`, numbers `[0-9]`, `_`, `-`) | `crops`, `agricultural-practice`, `foi-types`, `land-uses`, `schemes`, `soil-types`, `traffic-light-colours`, `decisions`, `event-types`, `judgement-reasons`, `lanes` |
| `names.` | string | NO | - Record's long name in given language
- Change `` in field name with appropriate [ISO 639 Language ID](https://www.localeplanet.com/icu/iso639.html#et) (for example, `names.en`)
- You can add names fields for several different languages (e.g. `names.en`, `names.sl`). | `crops`, `agricultural-practice`, `foi-types`, `land-uses`, `schemes`, `soil-types`, `traffic-light-colours`, `decisions`, `event-types`, `judgement-reasons`, `lanes` |
| `status` | string | YES | Record's status (usually `ACTIVE` but can be `HISTORIC`). | `crops`, `agricultural-practice`, `foi-types`, `land-uses`, `schemes`, `soil-types`, `traffic-light-colours`, `decisions`, `event-types`, `judgement-reasons`, `lanes` |
| `scope` | string | YES | Scope ID of the scope to which the Code list belongs. | `crops`, `agricultural-practice`, `foi-types`, `land-uses`, `schemes`, `soil-types`, `traffic-light-colours`, `decisions`, `event-types`, `judgement-reasons`, `lanes` |
| `has_financial_impact` | bool | YES | Record's financial impact (`True` or `False`) | `schemes` |
| `priority` | int4 | YES | Traffic light colour priority (the default is `0` ) | `traffic_light_colours` |
For example, the content of the CSV file to be used for adding records to the `crops` code list should look like this:
> code;names.en;names.sl;status;scope
1;buckwheat;ajda;ACTIVE;DEMO
2;sugar beet;sladkorna pesa;ACTIVE;DEMO
### Edit a Code list record
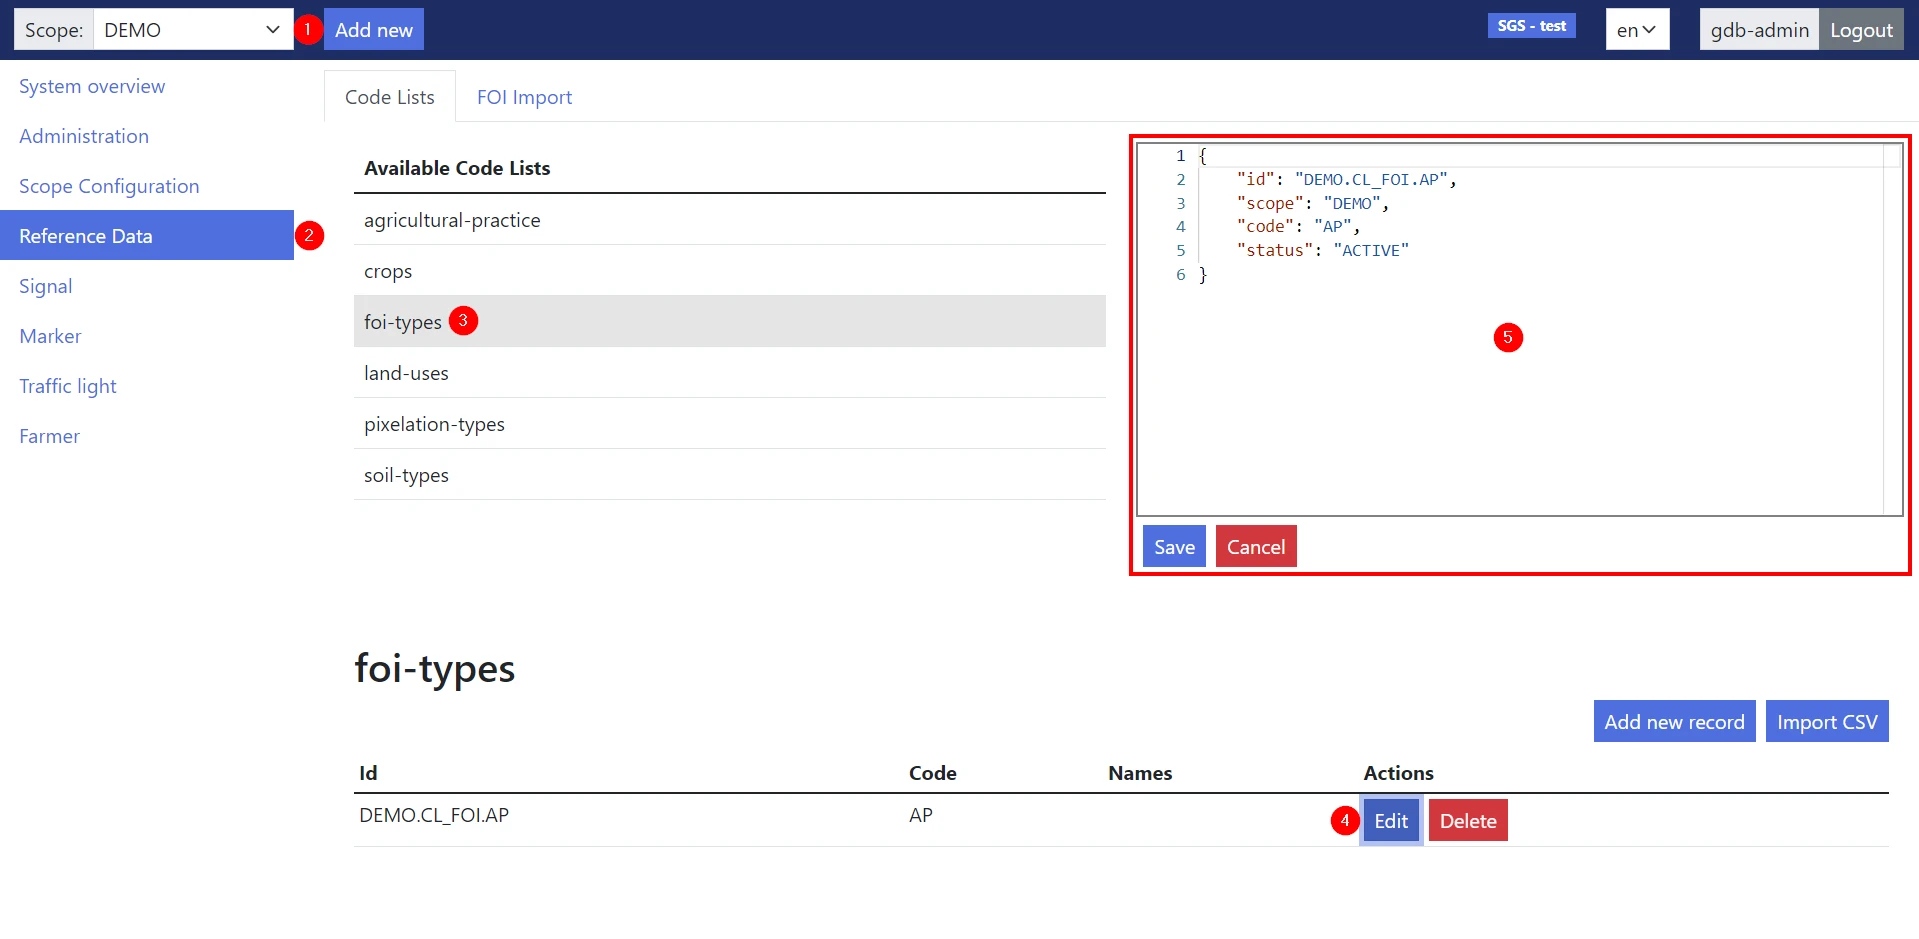
1. Select the appropriate **Scope**.
2. Go to the **Reference Data** | **Signal** | **Marker** | **Traffic light** section.
3. In the **Code Lists** tab, click on the desired Code list title.
4. Click the **Edit** button next to the record to be edited.
5. Edit the JSON text and click **Save**.
### Delete a Code list record
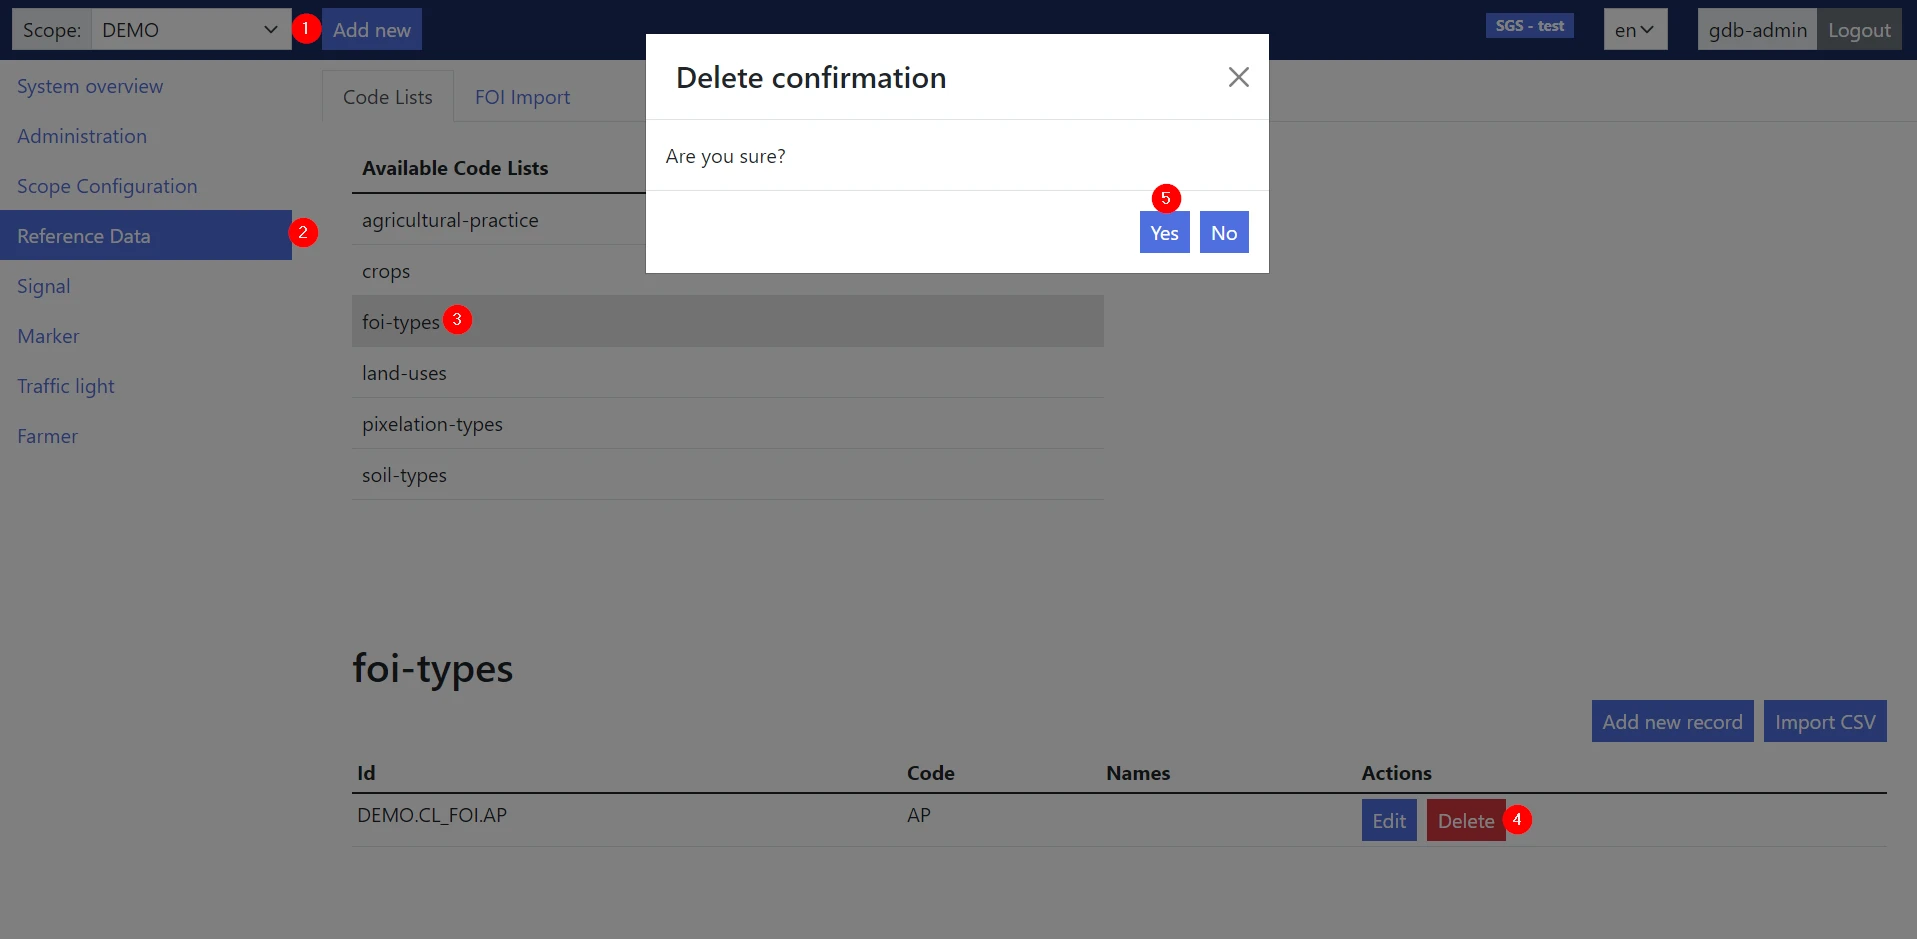
1. Select the appropriate **Scope**.
2. Go to the **Reference Data** | **Signal** | **Marker** | **Traffic light** section.
3. In the **Code Lists** tab, click on the desired Code list title.
4. Click the **Delete** button next to the record to be deleted.
5. In the **Delete confirmation** pop-up window, click **Save**.
## Import reference data from a GeoPackage file
This process assumes that:
* you [have populated the appropriate Code lists](#code-lists) from the **Code Lists** tab of the **Reference Data** section:
* `foi-types` (mandatory)
* `crops` (mandatory if in the GeoPackage file is specified the `crop_code`)
* `land-uses` (mandatory if in the GeoPackage file is specified the `land_use_code`)
* the GeoPackage adheres to the specifications
* you have uploaded the GeoPackage to a S3 bucket for which you [provided the credentials](#credentials).
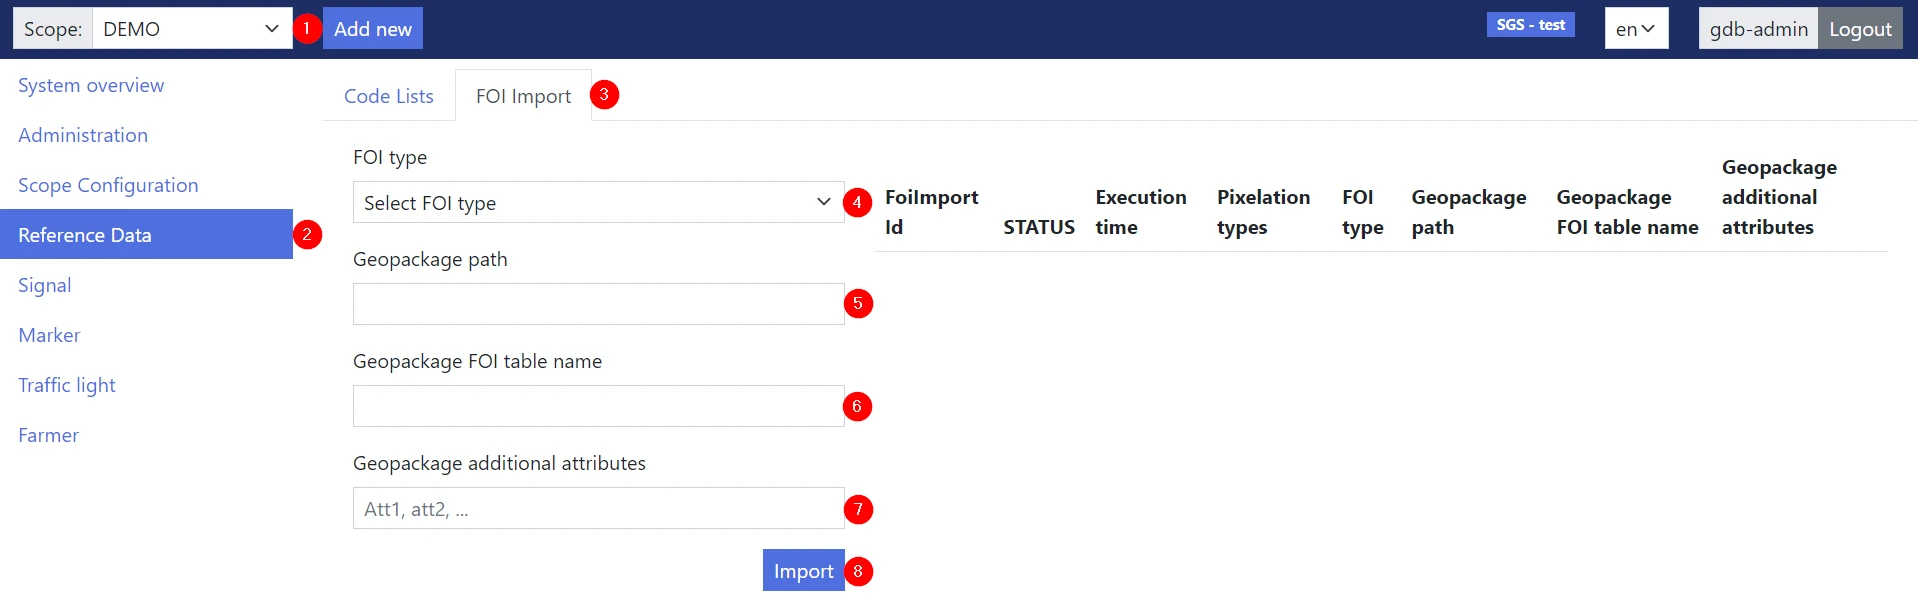
1. Select the appropriate **Scope**.
2. Go to the **Reference Data** section.
3. Go to the **FOI Import** tab.
4. Choose a FOI type from the drop-down menu which lists the `foi-types` Code list records.
5. In the **Geopackage path** field enter the file’s S3 path.
6. In the **Geopackage FOI table name** field enter the name of the GeoPackage table with the reference data to import.
7. In **Geopackage additional attributes** field enter the name of the attribute specified in addition to the attributes from the GeoPackage specifications for the reference data. In case of multiple additional attributes, the names of the columns should be separated by a `,` (comma) for example, Att1, att2, etc.
8. Click **Import**.
## Subscription
This feature enables you to specify the details required for retrieval of signals.
### Create a subscription
This process assumes that:
* you [have imported the reference data](#import-reference-data-from-a-geopackage-file)
* you [have populated the Code lists](#code-lists) from the **Code Lists** tab from the **Signal** section
* you have uploaded to the S3 bucket for which you [provided the credentials](#credentials) the CSV file with the FOI IDs for which you want to retrieve SH collection signals
* the signals will be downloaded to the S3 bucket for which you [provided the credentials](#credentials) .
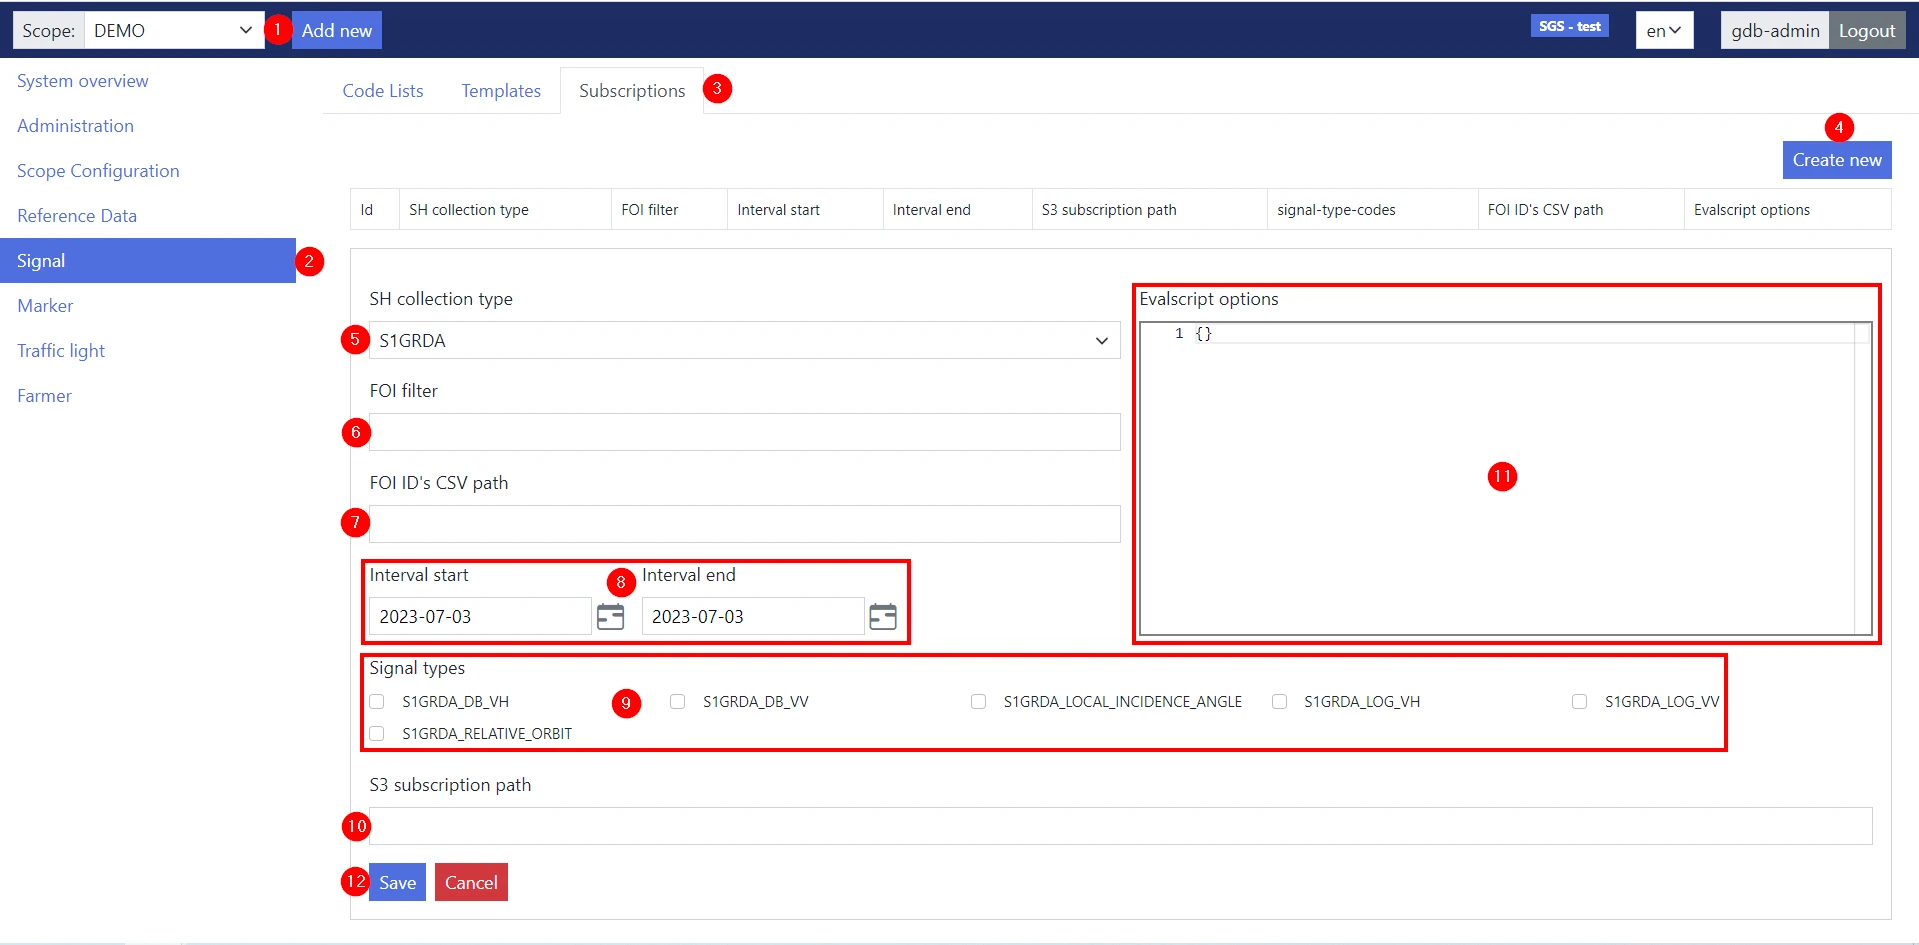
1. Select the appropriate **Scope**.
2. Go to the **Signal** section.
3. Go to the **Subscriptions** tab.
4. Click **Create new**.
5. Select a SH collection type from the drop-down menu which lists the `sh-collection-types` Code list records.
6. In **FOI filter** field enter the filter criteria if you want to retrieve SH collection signals only for the FOIs that match the entered criteria.
> For the filter criteria refer to the API documentation for the `/refdata/{scope}/fois/search` API endpoint under the `foi-controller` resource that can be accessed from the API documentation hyperlink of the `Reference data service` shown in the **System overview** section.
7. In **FOI ID's CSV path** field enter the file’s S3 path with the FOI IDs for which you want to retrieve the SH collection signals.
8. Enter the time interval for which you want to retrieve the SH collection signals.
9. Select the checkbox next to the SH collection signals you want to compute.
10. In **S3 subscription path** field enter the S3 bucket path where will be downloaded to the retrieved signals.
11. Configure advanced evalscript options such as `mosaicking`, `custom datamasks` and `preProcessScenes`. For more information, see the [Evalscipts](https://docs.planet.com/develop/evalscripts/) section.
12. Click **Save**.
### Edit a subscription
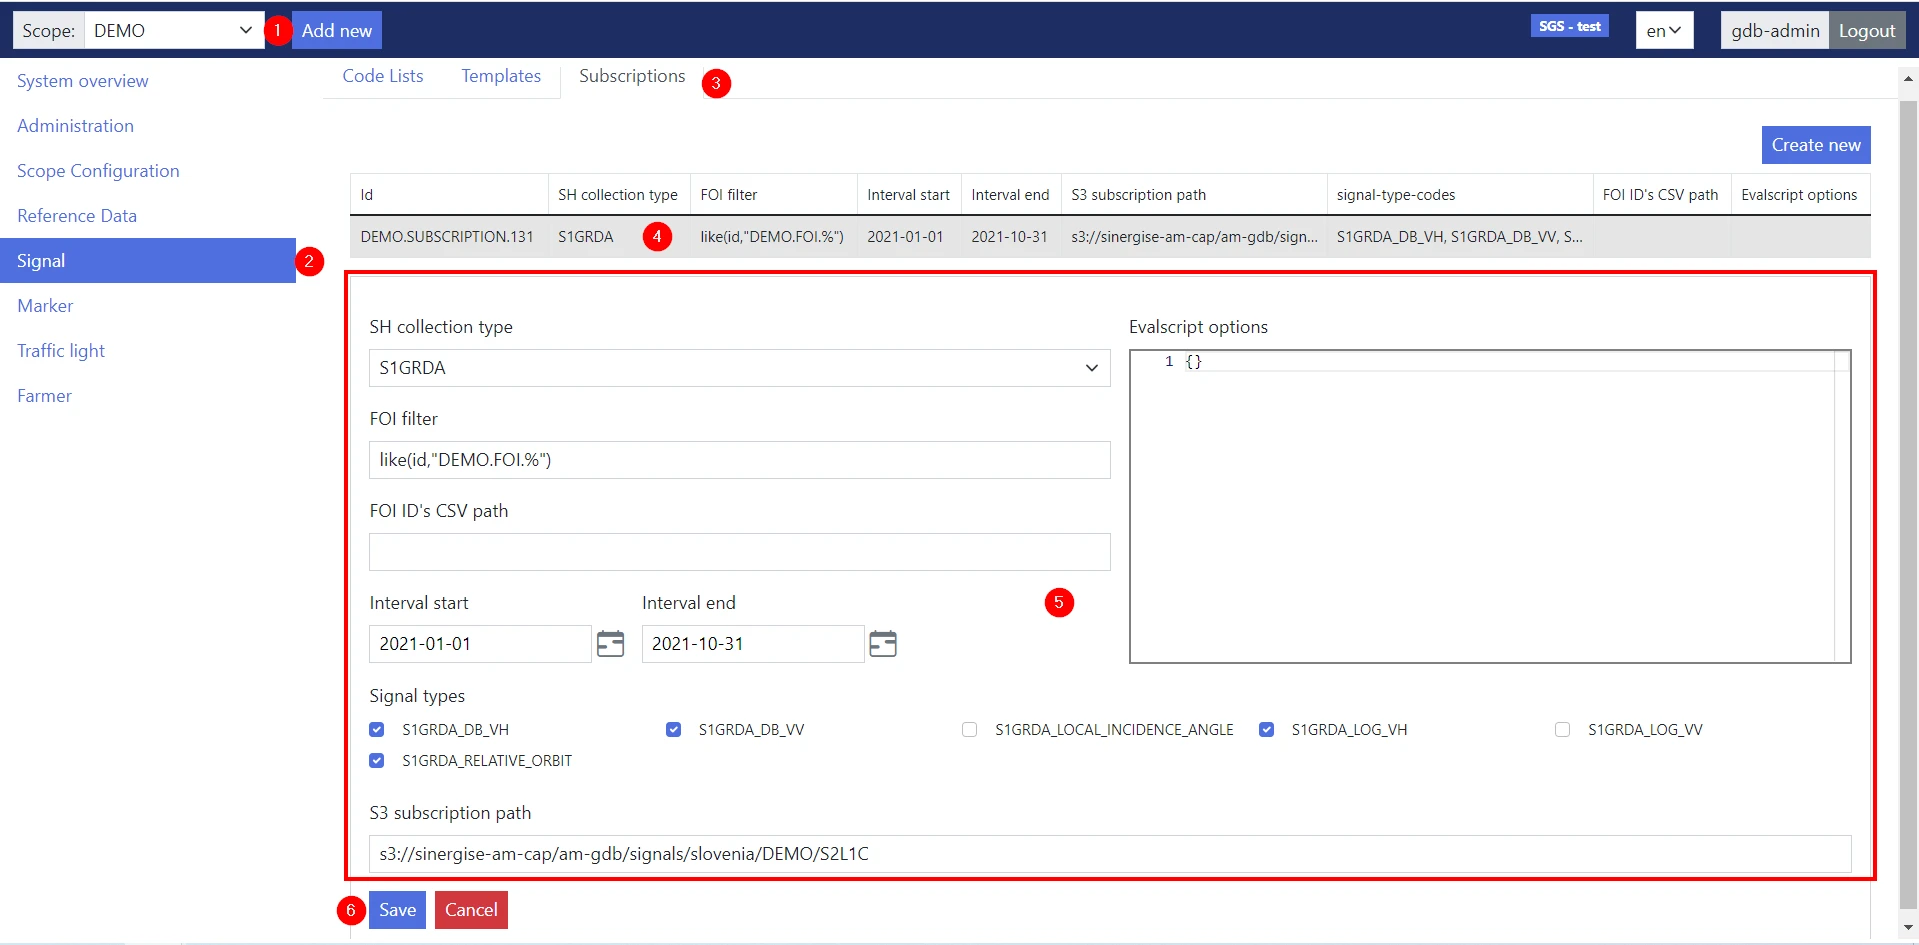
1. Select the appropriate **Scope**.
2. Go to the **Signal** section.
3. Go to the **Subscriptions** tab.
4. Click on the details of the desired subscription.
5. Edit any of the other editable fields that display. When changing the `Interval start` and `Interval end` keep in mind that subscriptions are only incremental in time. That means that if any signals were already downloaded (DONE signal packages exist) that `Interval start` should not be changed and `Interval end` can only be incremented in time. See [Create a subscription](#create-a-subscription) for an explanation of the fields.
6. Click **Save**.